If you are unable to finish the lab in the ProLUG lab environment we ask you
rebootthe machine from the command line so that other students will have the intended environment.
Resources / Important Links
- Killercoda Labs
- RedHat: User and Group Management
- Rocky Linux User Admin Guide
- Killercoda lab by FishermanGuyBro
Required Materials
- Rocky 9.4+ - ProLUG Lab
- Or comparable Linux box
- root or sudo command access
Downloads
The lab has been provided for convenience below:
Pre-Lab Warm-Up
Exercises (Warmup to quickly run through your system and practice commands)
mkdir lab_userscd /lab_userscat /etc/passwd- We'll be examining the contents of this file later
cat /etc/passwd | tail -5- What did this do to the output of the file?
cat /etc/passwd | tail -5 | nlcat /etc/passwd | tail -5 | awk -F : '{print $1, $3, $7}'- What did that do and what do each of the
$#represent? - Can you give the 2nd, 5th, and 6th fields?
- What did that do and what do each of the
cat /etc/passwd | tail -5 | awk -F : '{print $NF}'- What does this
$NFmean? Why might this be useful to us as administrators?
- What does this
alias- Look at the things you have aliased.
- These come from defaults in your
.bashrcfile. We'll configure these later
cd /rootls -lll- Output should be similar.
unalias llll- You shouldn't have this command available anymore.
lsunalias ls- How did
lschange on your screen?
- How did
No worries, there are two ways to fix the mess you've made.
Nothing you've done is permanent, so logging out and reloading a shell (logging back in) would fix this.
We just put the aliases back.
alias ll='ls -l --color=auto'alias ls='ls --color=auto'- Test with
aliasto see them added and also usellandlsto see them work properly.
- Test with
Lab 🧪
This lab is designed to help you get familiar with the basics of the systems you will be working on.
Some of you will find that you know the basic material but the techniques here allow you to put it together in a more complex fashion.
It is recommended that you type these commands and do not copy and paste them. Browsers sometimes like to format characters in a way that doesn't always play nice with Linux.
The Shadow password suite:
There are 4 files that comprise of the shadow password suite. We'll investigate them a bit and look at
how they secure the system. The four files are /etc/passwd, /etc/group, /etc/shadow, and /etc/gshadow.
-
Look at each of the files and see if you can determine some basic information about them
more /etc/passwd
more /etc/group
more /etc/shadow
more /etc/gshadow
There is one other file you may want to become familiar with:
more /etc/login.defsCheck the file permissions:
ls -l /etc/passwdDo this for each file to see how their permissions are set.
You may note that
/etc/passwdand/etc/groupare readable by everyone on the system but/etc/shadowand/etc/gshadoware not readable by anyone on the system. -
Anatomy of the
/etc/passwdfile/etc/passwdis broken down like this, a:(colon) delimited file:Username Password User ID (UID) Group ID (GID) User Info Home Directory Login Shell puppetx994991Puppet server daemon/opt/puppetlabs/server/data/puppetserver/sbin/nologin
cat or more the file to verify these are values you see.
Are there always 7 fields?
-
Anatomy of the
/etc/groupfile/etc/groupis broken down like this, a:(colon) delimited file:Groupname Password Group ID Group Members puppetx991foreman, foreman-proxycatormorethe file to verify these are the values you see. Are there always 4 fields?
-
We're not going to break down the
gfiles, but there are a lot of resources online that can show you this same information. Suffice it to say, the passwords, if they exist, are stored in an md5 digest format up to RHEL 5. RHEL 6,7,8 and 9 use SHA-512 hash. We cannot allow these to be read by just anyone because then they could brute force and try to figure out our passwords.
Creating and modifying local users:
We should take a second to note that the systems you're using are tied into our active directory with
Kerberos. You will not be seeing your account in /etc/passwd, as that authentication is occurring
remotely. You can, however, run id <username> to see user information about yourself that you have
according to active directory.
Your /etc/login.defs file is default and contains a lot of the values that control how our next commands
work
-
Creating users
useradd user1
useradd user2
useradd user3
Do a quick check on our main files:
tail -5 /etc/passwd
tail -5 /etc/shadow
What
UIDandGIDwere each of these given? Do they match up? Verify your users all have home directories. Where would you check this?ls /homeYour users
/home/<username>directories have hidden files that were all pulled from a directory called/etc/skel. If you wanted to test this and verify you might do something like this:cd /etc/skel vi .bashrcUse
vicommands to add the line:alias dinosaur='echo "Rarw"'Your file should now look like this:
# .bashrc
# Source global definitions
if [ -f /etc/bashrc ]; then
. /etc/bashrc
fi
alias dinosaur='echo "Rarw"'
# Uncomment the following line if you don't like systemctl's auto-paging feature:
# export SYSTEMD_PAGER=
# User specific aliases and functions
Save the file with
:wq.useradd user4 su - user4 dinosaur # Should roar out to the screenDoing that changed the
.bashrcfile for all new users that have home directories created on the server. An old trick, when users mess up their login files (all the.files), is to move them all to a directory and pull them from/etc/skelagain. If the user can log in with no problems, you know the problem was something they created.We can test this with the same steps on an existing user. Pick an existing user and verify they don't have that command
su - user1
dinosaur # Command not found
exit
Then, as root:
cd /home/user1 mkdir old_dot_files mv .* old_dot_files # Ignore the errors, those are directories cp /etc/skel/.* /home/user1 # Ignore the errors, those are directories su - user1 dinosaur # Should 'roar' now because the .bashrc file is new from /etc/skel -
Creating groups From our
/etc/login.defswe can see that the default range for UIDs on this system, when created byuseraddare:UID_MIN 1000 UID_MAX 60000So an easy way to make sure that we don't get confused on our group numbering is to ensure we create groups outside of that range. This isn't required, but can save you headache in the future.
groupadd -g 60001 project
tail -5 /etc/group
You can also make groups the old fashioned way by putting a line right into the
/etc/groupfile.
Try this:vi /etc/group- Shift+G to go to the bottom of the file.
- Hit
oto create a new line and go to insert mode. - Add
project2:x:60002:user4 - Hit
Esc :wq!to write quit the file explicit force because it's a read only file.
id user 4 # Should now see the project2 in the user's groups -
Modifying or deleting users So maybe now we need to move our users into that group.
usermod -G project user4
tail -f /etc/group # Should see user4 in the group
But, maybe we want to add more users and we want to just put them in there:
vi /etc/groupShift+GWill take you to the bottom.- Hit
i(will put you into insert mode). - Add
,user1,user2afteruser4. - Hit
Esc. :wqto save and exit.
Verify your users are in the group now
id user4 id user1 id user2 -
Test group permissions I included the permissions discussion from an earlier lab because it's important to see how permissions affect what user can see what information.
Currently we have
user1,2,4belonging to groupprojectbut notuser3. So we will verify these permissions are enforced by the filesystem.mkdir /project ls -ld /project chown root:project /project chmod 775 /project ls -ld /projectIf you do this, you now have a directory
/projectand you've changed the group ownership to/project. You've also given groupprojectusers the ability to write into your directory. Everyone can still read from your directory. Check permissions with users:su - user1 cd /project touch user1 exit su - user3 cd /project touch user3 exitAnyone not in the
projectgroup doesn't have permissions to write a file into that directory. Now, as the root user:chmod 770 /projectCheck permissions with users:
su - user1
cd /project
touch user1.1
exit
su - user3
cd /project # Should break right about here
touch user3
exit
You can play with these permissions a bit, but there's a lot of information online to help you understand permissions better if you need more resources.
Working with permissions:
Permissions have to do with who can or cannot access (read), edit (write), or execute (xecute)files. Permissions look like this:
ls -l
| Permission | # of Links | UID Owner | Group Owner | Size (b) | Creation Month | Creation Day | Creation Time | Name of File |
|---|---|---|---|---|---|---|---|---|
-rw-r--r--. | 1 | scott | domain_users | 58 | Jun | 22 | 08:52 | datefile |
The primary permissions commands we're going to use are going to be chmod (access) and chown (ownership).
A quick rundown of how permissions break out:
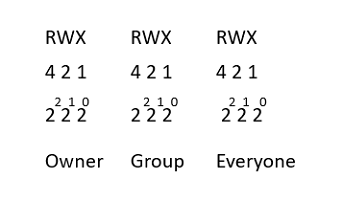
Let's examine some permissions and see if we can't figure out what permissions are allowed:
ls -ld /home/scott/
drwx------. 5 scott domain_users 4096 Jun 22 09:11 /home/scott/
The first character lets you know if the file is a directory, file, or link. In this case we are looking at my home directory.
rwx: For UID (me).
- What permissions do I have?
---: For group.
- Who are they?
- What can my group do?
---: For everyone else.
- What can everyone else do?
Go find some other interesting files or directories and see what you see there.
Can you identify their characteristics and permissions?
Be sure to
rebootthe lab machine from the command line when you are done.