NOTE: This is an optional bonus section. You do not need to read it, but if you're interested in digging deeper, this is for you.
This bonus lab is designed to provide material and exercises in applying the skills and principles outlined by this course.
Students will:
- Install necessary lab dependencies,
fail2ban,ssh,nginx - Build troubleshooting, deductive reasoning, and investigative skills
- Edit configuration files, utilize many command line tools,
systemctl,vi - Understand specific use case cyber security tools
- And more
Resources / Important Links
- https://github.com/fail2ban/fail2ban
- https://www.digitalocean.com/community/tutorials/how-fail2ban-works-to-protect-services-on-a-linux-server
- https://nginx.org/en/docs/beginners_guide.html
- https://www.openssh.com/features.html
- https://docs.redhat.com/en/documentation/red_hat_enterprise_linux/8/html/configuring_and_managing_networking/getting-started-with-nftables_configuring-and-managing-networking#con_basics-of-nftables-tables_assembly_creating-and-managing-nftables-tables-chains-and-rules
- https://developers.cloudflare.com/waf/get-started/
Required Materials
- Rocky 9.4+ host
- Or comparable Linux box
- root or sudo command access
Bonus Pre-Lab Warm-Up
First lets identify a couple dependencies for this lab. Since many of the labs in
this course are predicated on Rocky we will provide commands like dnf and rpm
to accomplish this task:
rpm -ql openssh-server
This command will list configuration files and underlying dependent libraries required
to run an SSH server if openssh-server is installed locally. But be careful,
sometimes this query will list lingering configuration files and directories even though
it isn't installed.
To corroborate our findings, let's query dnf:
dnf list --installed | grep openssh-server
All else fails you can always attempt a find command to verify the presence of SSH
and its server side counter part SSHD (D for daemon):
find / -name ssh; find / -name sshd
You may need to use the -xdev flag if other filesystems are present or traversable that are
external to the host that find executes from, this flag comes in handy with WSL subsystems or
hosts residing within a hypervisor that have other host file systems mounted and accessible.
Fair warning, this command may spit out a lot of output. Familiarity with the Linux filesystem and its inner machinations should prepare you for this moment. If not, this command attempts to find every file with ssh or sshd in it from the root of the host's file system '/'.
If the piped grep or find command comes up empty openssh-server is likely not installed, attempt to
install it. Hopefully these commands and strategies are familiar to you:
dnf install openssh-server
Now repeat this process for nginx, and fail2ban.
What are nginx and fail2ban you ask?
Well now is a great time to use the man pages.
If a man command ever fails due to a lack of 'manual entry' that means you may need to
install the package or you have a path issue. However if the shell returns that the man
command is not found you may need to install man-db.
Hopefully it's becoming clear why understanding our tools, troubleshooting, and deductive reasoning skills come in handy!
dnf install -y nginx fail2ban man-db

# We should now be able to man nginx and fail2ban
# if we couldn't before

man nginx
man fail2ban
Now that they're installed let's enable sshd and nginx from systemctl.
systemctl enable --now sshd # the --now flag along will also start the service
systemctl enable --now nginx
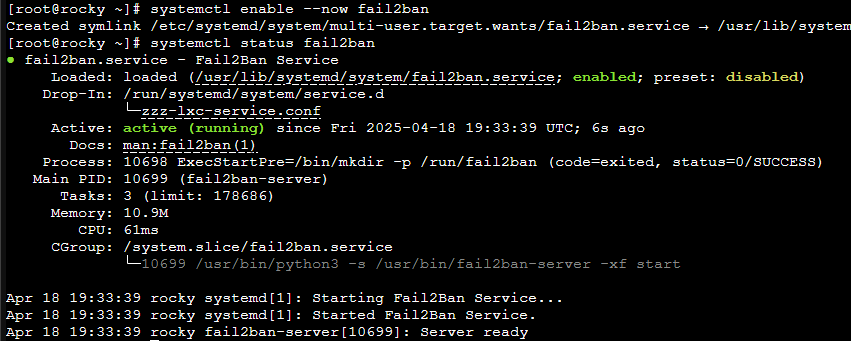
We should now be able to see these services are running in a myriad of ways:
ss -ntulp | grep ssh
ss -ntulp | grep nginx

systemctl status sshd
systemctl status nginx
Ideally these services are hosted on a student owned device/host and not the ProLUG lab
boxes. With these enabled it should be possible to ssh into the host or visit the nginx
web page via http://(localhost or {IP address}) from a web browser.
Technically you could curl localhost from the ProLUG Rocky box and capture the html
nginx hosts and ssh into the box from a different box to verify they are enabled.
Bonus Lab 🧪
SSH, NGINX and implementing Fail2Ban
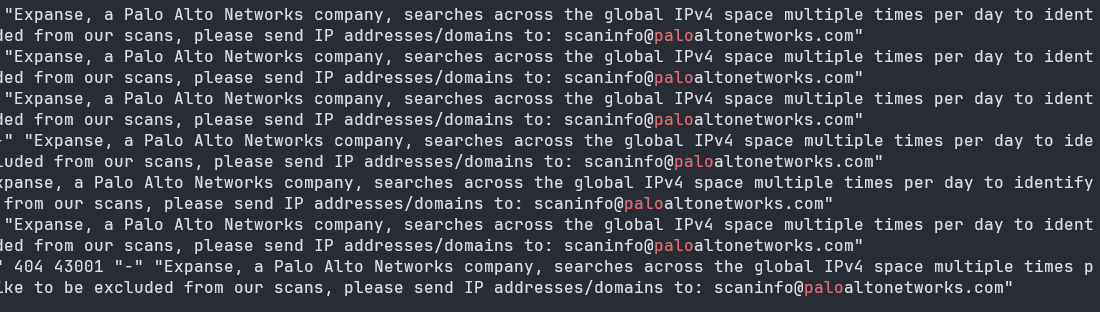
When services like SSH and NGINX (pronounced 'engine-x') are exposed to the public internet it will become exceedingly apparent (in seconds if not minutes) within their log files that they are under bombardment from web scrapers, bots, hackers, and more.
The goals of these entities are either malicious, self serving, or helpful in the case of organizations like Palo Alto who build databases for cybersecurity purposes.
An example of an nginx access.log file with Palo Alto's Expanse web scraping arm is shown below:
Fail2Ban
Fail2Ban is a small part of a larger solution in mitigating and monitoring these threats and actors. While more robust solutions exist from providers like Cloudflare or Fortinet this lab hopes to introduce a small foray into implementing a more manageable solution for students.
Plus, it's kinda cool and pretty fun.
How Fail2Ban Works
Fail2Ban is designed to analyze log files and manipulate the host's firewall to programmatically ban offending IP addresses based on various conditions predicated by specific configuration files.
First let's briefly skim Fail2Ban's main configuration file:
vi /etc/fail2ban.conf
# Fail2Ban main configuration file
#
# Comments: use '#' for comment lines and ';' (following a space) for inline comments
#
# Changes:  in most of the cases you should not modify this
#           file, but provide customizations in fail2ban.local file, e.g.:
#
# [DEFAULT]
# loglevel = DEBUG
#

[DEFAULT]

# Option: loglevel
# Notes.: Set the log level output.
#         CRITICAL
#         ERROR
#         WARNING
#         NOTICE
#         INFO
#         DEBUG
# Values: [ LEVEL ]  Default: INFO
#
loglevel = INFO

# Option: logtarget
# Notes.: Set the log target. This could be a file, SYSTEMD-JOURNAL, SYSLOG, STDERR or STDOUT.
#         Only one log target can be specified.
#         If you change logtarget from the default value and you are
#         using logrotate -- also adjust or disable rotation in the
#         corresponding configuration file
#         (e.g. /etc/logrotate.d/fail2ban on Debian systems)
# Values: [ STDOUT | STDERR | SYSLOG | SYSOUT | SYSTEMD-JOURNAL | FILE ]  Default: STDERR
#
logtarget = /var/log/fail2ban.log

Remaining output redacted...
Generally this file can remain in its default configuration. We are however interested in
its log path of /var/log/fail2ban.log. If we ever need to investigate or debug Fail2Ban
we now know where it logs its decisions when an actionable event arises.
A further configuration file we are interested in is Fail2Ban's jail.conf. Let's look at
Fail2Ban's man jail.conf entry first:
CONFIGURATION FILES FORMAT
 *.conf  files  are distributed by Fail2Ban.  It is recommended that *.conf files should
  remain unchanged to ease upgrades.  If needed, customizations should be provided in *.local files.
  For example, if you would like to enable the [ssh-iptables-ipset] jail specified in jail.conf,
  create jail.local containing

 jail.local
        [ssh-iptables-ipset]

        enabled = true

 In .local files specify only the settings you would like to change and the rest of the configuration
  will then come from the corresponding .conf file which is parsed first.

 jail.d/ and fail2ban.d/

        In addition to .local, for jail.conf or fail2ban.conf file there can be a corresponding .d/
        directory containing additional .conf  files.  The order e.g. for jail configuration would be:

        jail.conf
        jail.d/*.conf (in alphabetical order)
        jail.local
        jail.d/*.local (in alphabetical order).

        i.e.  all  .local  files  are  parsed after .conf files in the original configuration file and files
        under .d directory.  Settings in the file parsed later take precedence over identical entries in
        previously parsed files.  Files are ordered alphabetically, e.g.

        fail2ban.d/01_custom_log.conf - to use a different log path
        jail.d/01_enable.conf - to enable a specific jail
        jail.d/02_custom_port.conf - to change the port(s) of a jail.
This section is what we are most interested in. We see that Fail2Ban recommends utilizing jail.local
files and drop-in directories to preserve initial configuration files and to facilitate updates down
the road.
Further, lets now take a brief look at the jail.conf file and get an understanding of the options
available to us. While this is a lot of information to take in it should be embraced for this is the
bread and butter of becoming a better administrator. Understanding the tools available to us.
And for what it's worth, we don't need to know this tool down to its quantum level. "Just enough to get the job done."
vi /etc/fail2ban/jail.conf
Understanding jail configuration options as shown below are some of the many configuration details that will go a long way to intelligently protecting our services and systems.
#
# MISCELLANEOUS OPTIONS
#

# "bantime.increment" allows to use database for searching of previously banned ip's to increase a
# default ban time using special formula, default it is banTime * 1, 2, 4, 8, 16, 32...
#bantime.increment = true

# "bantime.maxtime" is the max number of seconds using the ban time can reach (doesn't grow further)
#bantime.maxtime =

# "bantime.factor" is a coefficient to calculate exponent growing of the formula or common multiplier,
# default value of factor is 1 and with default value of formula, the ban time
# grows by 1, 2, 4, 8, 16 ...
#bantime.factor = 1
Implementing Fail2Ban
Let's keep these types of options in mind and now look at an example of a basic jail.local file to
protect our SSH server.
Based upon our observations earlier this command will make the necessary jail.local file we will
need in its proper directory.
vi /etc/fail2ban/jail.local
And now let's define some necessary options to begin protecting SSH from broad attack.
[DEFAULT]
bantime            =  1h
maxretry           =  2
bantime.increment  =  true
bantime.factor     =  12
bantime.maxtime    =  5w
ignoreip           =  {IP_ADDRESS} # useful to prevent banning oneself

[sshd]
backend            =  systemd # required for systemd based systems
enabled            =  true
Let's make sure to save our new jail.local file before we restart Fail2Ban. The following command
will write and persist the local jail configuration file and quit out of Vim, if you didn't know how
to do this already.
:wq
It took a lot to get here but it's important to understand our firearms before we fire them. For something like Fail2Ban could potentially permanently lock us out of a system under the right circumstances and make us have a very bad day indeed.
While there are more options available for a jail.local file, this should suffice to ban repeat
offenders who attempt to use an incorrect password on the SSH service. Any other required definitions
to properly implement this jail.local file for SSH will be parsed before hand as was stipulated in
the man page and the jail.conf file.
After that we must restart the Fail2Ban service to implement our changes.
systemctl restart fail2ban
Monitoring Fail2Ban
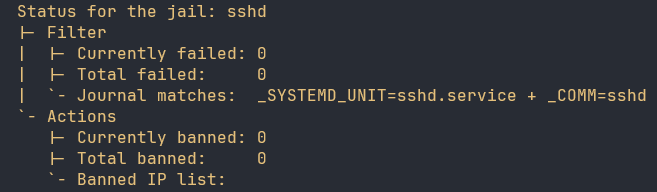
Now if everything is configured properly we should be able to input the following command to see a list of currently banned IP addresses:
fail2ban-client status sshd
Typically SSH services should not be exposed publicly to the internet, and if they are they should utilize public key infrastructure (PKI) with specific security constraints (see STIG or CIS Benchmark Controls). Generally It is a far better solution to lock SSH access behind an internal or Virtual Private Network (VPN) where the potential of a "slow brute-force" attack will be mitigated almost entirely.
However you still might institute Fail2Ban even behind a VPN in the event a threat actor does gain access to the VPN and attempts to brute force or slow brute force attack hosts with SSH services exposed that utilize passwords instead of PKI. However in this day and age password protected SSH access could be considered a security controls finding. Use PKI whenever possible.
NGINX
If you've made it this far I appreciate your tenacity or perhaps deep captivation of this subject.
Now where Fail2Ban really shines is when integrated with an application like nginx.
As we'll see Fail2Ban allows us to configure what they call "filters" that can further protect nginx and our website,
if we had one. Since this lab has ran long I will keep it brief.
Suffice it say for students this is theory, but as I will mention later these filters can be quite powerful.
Let's look at what is available to us for nginx:
ls /etc/fail2ban/filter.d/ | grep nginx
nginx-bad-request.conf
nginx-botsearch.conf
nginx-error-common.conf
nginx-forbidden.conf
nginx-http-auth.conf
nginx-limit-req.conf
Well, what do we have here?
I encourage you to explore all of these available filters however in my experience the
nginx-bad-request.conf filter has been most useful in banning bad actors.
cat /etc/fail2ban2/filter.d/nginx-bad-request.conf
# Fail2Ban filter to match bad requests to nginx
#

[Definition]

# The request often doesn't contain a method, only some encoded garbage
# This will also match requests that are entirely empty
failregex = ^<HOST> - \S+ \[\] "[^"]*" 400

datepattern = {^LN-BEG}%%ExY(?P<_sep>[-/.])%%m(?P=_sep)%%d[T ]%%H:%%M:%%S(?:[.,]%%f)?(?:\s*%%z)?
              ^[^\[]*\[({DATE})
              {^LN-BEG}

journalmatch = _SYSTEMD_UNIT=nginx.service + _COMM=nginx

# Author: Jan Przybylak
Whenever nginx receives a "bad request", think
an HTTP method request for a link, file, or API call that is malformed or improperly formatted from a client, Fail2Ban
will recognize it from the nginx access.log by an HTTP Status Code 400 returned by nginx and act appropriately based
upon our default action options.
(After 2 bad requests, you get banned for an hour. After that timeout, if you send 2 more bad requests the timeout is extended for 12 hours, growing exponentially for each occurrence afterwards up to a 5 week ban. It is typically advised against implementing permanent bans as over time this could lead to potentially significant overhead for the host or lockout legitimate users unintentionally.)
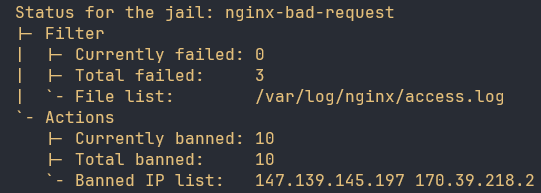
When running this filter on my own personal nginx web server over the course of 30 days I will have banned over 40,000 IP addresses with varying ban times. But note that this filter can and will match requests that are malformed from the site itself. If a link or API implementation hosted from the nginx web server is incorrect Fail2Ban could be banning legitimate traffic unintentionally. Be sure to observe due diligence in log files or web traffic when first implementing such a filter.
As of rebooting my publicly available website not minutes ago this is how many IP addresses are already banned.
Ideally Fail2Ban is configured to utilize nftables, a modernized and significantly improved Linux firewall backend solution,
and some type of firewall backend wrapper like firewalld which can be configured for specific firewall backend
architectures like iptables, and nftables.
Configuring Fail2Ban with firewalld or nftables will look like such:
[DEFAULT]
..etc
banaction           =  firewallcmd-rich-rules[actiontype=<multiport>]
banaction_allports  =  firewallcmd-rich-rules[actiontype=<allports>]

# Or

[DEFAULT]
..etc
banaction           =  nftables
banaction_allports  =  nftables[type=allports]
And here is how Fail2Ban modifies an iptables chain.
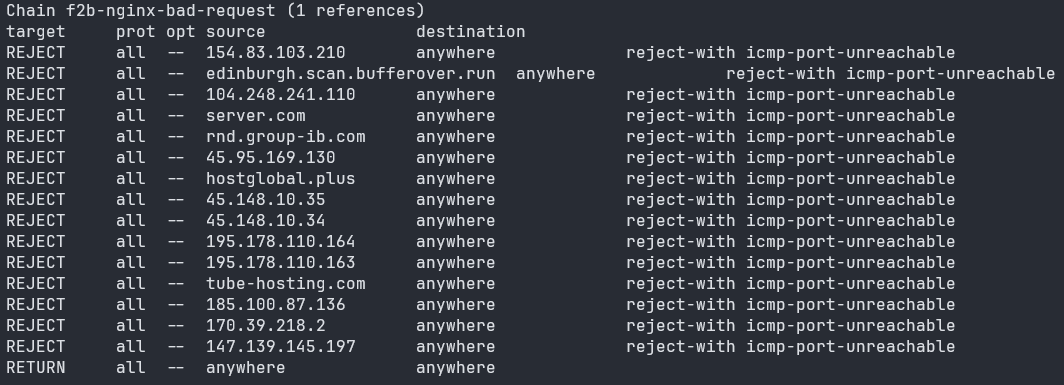
I highly, highly encourage students have a working understanding of Linux firewalls and their components like tables and chains.
It's important to be stated that this should be understood as a mitigation, not a perfect solution. Primarily to minimize automated bots scraping a domain, usually for nefarious purposes.
And I will iterate that there are far better solutions. Some for free and others, (Cloudflare WAF), for a modest fee that protect more intelligently and robustly than Fail2Ban. Migrating your domain over to Cloudflare or equivalent service is probably the far smarter and less work intensive task than a comprehensive Fail2Ban setup. But I like to think we're building our muscles... you know, putting in reps.
Filter Implementation
Remembering our previous configurations we know that if a user sends more than two malformed, either malicious or unintentional, requests to our website they will be temporarily banned.
vi /etc/fail2ban/jail.local
Here is what the configuration file should look like after we implement this filter:
[nginx-bad-request]
enabled  =  true
port     =  http,https
logpath  =  %(nginx_access_log)s
Append these lines to the earlier file we implemented after our SSHD section and let the regex do the work for us.
Be sure to save the file:
:wq
Then finally restart Fail2Ban again:
systemctl restart fail2ban
It's as simple as that.
You can use fail2ban-client status nginx-bad-request to monitor any actions Fail2Ban has taken to ban bad actors
or investigate the /var/log/fail2ban.log file.
Well that about wraps it up. There is far more to consider when it comes to protecting web servers and SSH, but hopefully this was a good primer and helped exercise those Linux muscles.