Welcome to the ProLUG Security Engineering Course Book.
This Book
Contains all materials pertaining to the course including links to external resources. It has been put together with care by a number of ProLUG group members referencing original instructional materials produced by Scott Champine (Het Tanis).
The content is version controlled with Git and stored here: https://github.com/ProfessionalLinuxUsersGroup/psc/
Furthermore, the book has been built with mdbook for ease of navigation. Be sure to try the search functionality.
Course Description
This course addresses how to secure Linux a corporate environment. This course will focus on adhering to regulations, best practices, and industry standards. This course will expose the concepts of controls, their implementation, and how they fit into overall security posture. The learner will practice securely building, deploying, integrating, and monitoring Linux systems. Standard security documentation and reporting will be practiced throughout, to better prepare the learner for the industry.
Prerequisite(s) and/or Corequisite(s):
Prerequisites: None
Credit hours: N/A
Contact hours: 100 (40 Theory Hours, 60 Lab Hours)
Course Summary
Major Instructional Areas
- Build Standards and Compliance
- Securing the Network Connection
- User Access and System Integration
- Bastion Hosts and Air-Gaps
- Updating Systems and Patch Cycles
- Monitoring and Parsing Logs
- Monitoring and Alerting
- Configuration drift and Remediation
- Certificate and Key Madness
Course Objectives
- Build and configure a Linux system to adhere to compliance frameworks
- Integrating Linux to a network in a secure fashion
- Integrating Linux with Enterprise Identity and Access Management (IAM) frameworks
- Implement User ingress controls to a system/network with bastion frameworks
- Updating Linux to resolve security vulnerabilities and reporting out to security teams
- Design logging workflows to move event logging off of systems for real time monitoring
- Monitoring and alerting on events in Linux
- Maintaining system configuration drift and remediation
Written Discussions
Are assigned as 'Discussion Posts' within each unit. Discussions generally take place within the Discord Server under #prolug-projects. More specifically, each unit will contain links to particular discussion posts within #prolug-projects.
Completing the Course
In order to complete this course students must participate in group discussions and complete provided labs. Additionally, students are to propose and complete a final project involving skills learned from the course.
Recommended Tools, Resources, and Frameworks
- Killercoda: https://killercoda.com/
- STIG Resources: https://public.cyber.mil/stigs/srg-stig-tools/
- Recommended (but not required) STIG Viewer: v2.18
- NIST: https://www.nist.gov/
- Open Worldwide Application Security Project Top 10: https://owasp.org/www-project-top-ten/
- CIS Controls and Benchmarks: https://www.cisecurity.org/cis-benchmarks
Required Resources
Option #1 (Killercoda Machine)
Cloud Lab server running Ubuntu on Killercoda.
Minimal resources can accomplish our tasks
- 1 CPU
- 2 GB Ram
- 30 GB Hard Drive
- Network Interface (IP already setup)
Option #2 (Home Lab)
Local VM server running: RHEL, Fedora, Rocky
Minimal resources
- 1 CPU
- 2GB RAM
- Network Interface (Bridged)
Option #3 (ProLUG Remote Lab)
ProLUG Lab access to Rocky 9.4+ instance.
Minimal resources can accomplish our tasks
- 1 CPU
- 4 GB RAM
- Network Interface (IP already setup)
Course Plan
Instructional Methods
This course is designed to promote learner-centered activities and support the development of Linux security skills. The course utilizes individual and group learning activities, performance-driven assignments, problem-based cases, projects, and discussions. These methods focus on building engaging learning experiences conducive to development of critical knowledge and skills that can be effectively applied in professional contexts.
Class Size
This class will effectively engage 40-60 learners.
Class Schedule
https://discord.com/events/611027490848374811/1353330418669326407
Class will meet over weekend (Brown bag) sessions. 1 time per week, for 10 weeks. There will be a total of 10 sessions.
| Session | Topic |
|---|---|
| 1 | Unit 1 - Build Standards and Compliance |
| 2 | Unit 2 - Securing the network connection |
| 3 | Unit 3 - User Access and system integration |
| 4 | Unit 4 - Bastion hosts and airgaps |
| 5 | Unit 5 - Updating systems and patch cycles |
| 6 | Unit 6 - Monitoring and parsing logs |
| 7 | Unit 7 - Monitoring and alerting |
| 8 | Unit 8 - Configuration drift and remediation |
| 9 | Unit 9 - Certificate and key madness |
| 10 | Unit 10 - Recap and final project |
Suggested Learning Approach
In this course, you will be studying individually and within a group of your peers, primarily in a lab environment. As you work on the course deliverables, you are encouraged to share ideas with your peers and instructor, work collaboratively on projects and team assignments, raise questions, and provide constructive feedback.
Students wishing to complete the Security Engineering course are expected to devise and complete a capstone project, to be turned in at the end of the course.
The instructions, expectations, and deliverables for the project are listed on this page.
Instructions
-
We have picked up a new client. They are requesting we help them adhere to the HIPAA compliance standard. Review an explanation of the standard here:
https://www.hhs.gov/hipaa/for-professionals/security/laws-regulations/index.html- If you are in the EU and want to substitute GDPR, you may do so.
https://gdpr.eu/what-is-gdpr/
- If you are in the EU and want to substitute GDPR, you may do so.
-
Build the documentation for HIPAA Compliance.
- How are we implementing Risk analysis and management?
- What are our safeguards?
- Administrative
- Physical
- Technical
- How do we form Business Associate Agreements
- What are our documentation practices?
- Policies
- Procedures
- Update and review cadence
-
Prepare to Present (https://www.overleaf.com/ is a great alternative to Powerpoint)
- Setup a 15-20 slide deck on what you did
- Project purpose
- Diagram
- Build Process
- What did you learn?
- How are you going to apply this?
- Setup a 15-20 slide deck on what you did
-
Do any of you want to present?
- Let Scott know (@het_tanis) and we’ll get you a slot in the last few weeks.
Deliverables
- A 15-20 slide presentation of the above material that you would present to a group
(presenting to us is voluntary, but definitely possible.)
- This can be done with Microsoft PowerPoint, LibreOffice Impress, or overleaf.com.
Each course run through the Professional Linux Users Group (ProLUG) allows you to earn a certification upon completion.
Certificates are awarded to those who complete the course within the timeframe that it is being run through the ProLUG Discord.
- To see when courses are running, join the ProLUG Discord server and check the Events section.
If you aim to earn the certification for completing this course, you must follow the guidelines set forth in this document.
There are four main components to earning the certification.
Worksheet Completion
Each unit has a corresponding worksheet.
On this worksheet are discussion questions, terms/definitions, optional "digging
deeper" sections, and reflection questions.
These worksheets must be filled out and kept until the end of the course.
Upon reaching the end, they are to be submitted to the instructor (Scott Champine).
Worksheet Submission Format
The format in which you submit these worksheets is up to you.
Some students prefer to keep them in a GitHub repository, others prefer to just keep them as files on their machines and submit via email.
Discussion Questions
Each unit's worksheet contains multiple discussion questions.
Each discussion question has its own thread in the ProLUG Discord server, in the
#course-discussion-posts forum channel.
To qualify for certification, you must:
- Post your answer to each discussion question in the correct thread.
- Respond to another student's answer in the same thread.
The goal of this is not to create busywork, but to spark discussions and see things from other points of view.
Lab Completion
Each unit has a lab that is to be completed.
The labs, like the worksheets, should be also completed and saved until the end of the course.
These labs should be submitted to the instructor along with the worksheets in the same format of your choice.
Final Project
Each ProLUG course has students complete a capstone project.
This is a requirement for earning a ProLUG course certification.
The project must meet the standards set forth in the Final Project Outline (or otherwise be approved by the instructor, Scott Champine).
In the Beginning
Founded approximately 15 years ago, the Professional Linux User Group (ProLUG) began as a vision of Het Tanis, known by his community alias 'Scott Champine.' Het identified the need for an informal yet structured space where Linux professionals could share knowledge, collaborate, and grow together. What started as local in-person meetups quickly gained traction, thanks to the increasing demand for open-source collaboration and the widespread adoption of Linux in both enterprises and personal projects.
Why ProLUG Started
ProLUG was born out of the recognition that Linux professionals often face challenges that are best solved through peer collaboration and hands-on experience. The community’s founding principles were rooted in creating an environment where newcomers could learn from experienced professionals, and seasoned users could gain exposure to advanced topics and emerging technologies. Its core mission was simple yet impactful: to provide continuous growth opportunities in Linux system administration, automation, and cloud technologies.
Some of the key motivations behind ProLUG's formation include:
- Peer Support: Helping members solve technical challenges through discussion and advice from experts.
- Knowledge Sharing: Encouraging open sharing of tips, tricks, configurations, and scripts related to Linux and open-source tools.
- Hands-on Learning: Providing access to practical labs, exercises, and real-world scenarios for hands-on training.
- Community Mentorship: Offering a space for members to mentor and be mentored by others in different stages of their careers.
- Certification Prep: Assisting members in preparing for recognized industry certifications.
The Expansion into an Online Community
While initially focused on local in-person meetings, ProLUG embraced online platforms to extend its reach globally. The switch to a virtual model enabled:
- Global Networking: Professionals and enthusiasts from around the world could now connect, learn, and collaborate without geographical limitations.
- 24/7 Discussion: Via platforms like Discord, members could share insights, discuss Linux problems, and exchange ideas anytime, anywhere.
- Greater Diversity: The online expansion diversified the member base, incorporating individuals from various industries and technical backgrounds, creating a rich environment for problem-solving.
Interactive Labs and Training Programs
One of ProLUG’s most successful expansions has been its focus on interactive, hands-on labs. To bridge the gap between theory and practice, Het Tanis launched a series of labs on platforms like Killercoda, covering a variety of topics including:
- Linux Essentials and System Administration
- Ansible Automation
- Kubernetes and Container Orchestration
- Security and Network Hardening
With over 50 interactive labs available and more being continuously developed, members benefit from practical scenarios that simulate real-world challenges. The labs cater to beginners, intermediates, and experts, ensuring everyone has something to gain.
Certification and Career Development
In 2024, ProLUG launched its first structured certification course: Enterprise Linux Administration. This program was designed to provide a comprehensive curriculum covering topics such as:
- Advanced Linux system configuration
- Enterprise networking and services
- Security management
- Scripting and automation
The first cohort of graduates successfully completed the program in January 2025, marking a major milestone in ProLUG’s commitment to professional development. Many graduates have reported success stories, such as landing new jobs, securing promotions, or gaining confidence in their Linux expertise.
What is a User Group?
A user group is a community of individuals who come together to share common interests, typically in a specific area of technology, such as Linux. These groups can be local or online and serve as platforms for:
- Collaboration: Members work together to troubleshoot, build projects, and share experiences.
- Networking: Opportunities to connect with professionals, mentors, and employers within the field.
- Learning: Workshops, presentations, and discussions that cover new and emerging technologies.
- Career Growth: Access to resources, training programs, and job opportunities.
ProLUG is a prime example of how a user group can grow beyond its initial purpose, evolving into a vibrant global community with practical learning opportunities and real-world outcomes.
Success Stories
Being part of ProLUG has proven highly beneficial for many members, with success stories ranging from career advancements to personal growth:
- Job Opportunities: Members have found jobs in system administration, DevOps, and cloud engineering roles through networking within ProLUG.
- Certifications: Many members have successfully obtained Linux-related certifications, including RHCSA, RHCE, and LFCS, using ProLUG’s resources and mentorship programs.
- Skill Development: Through interactive labs and group discussions, members have honed skills in automation (Ansible), scripting (Bash, Python), containerization (Docker, Kubernetes), and more.
- Mentorship Relationships: Senior professionals have mentored newcomers, creating a cycle of continuous learning and knowledge sharing.
Current Milestones
- 3,000+ Members: ProLUG’s global community continues to grow rapidly, attracting Linux enthusiasts and professionals from various backgrounds.
- 50+ Interactive Labs: Covering diverse topics, from basic Linux administration to advanced enterprise systems management.
- Ongoing Training Programs: Continuous updates to certification preparation courses, interactive workshops, and guided lab exercises.
ProLUG’s commitment to fostering a collaborative environment has made it a go-to community for anyone interested in Linux. Whether you're a beginner looking to learn the basics or an experienced professional aiming to advance your career, ProLUG offers a pathway to success.
Overview
Building standards and compliance in cybersecurity engineering ensures that systems adhere to industry best practices, regulatory requirements, and security frameworks, reducing risks and vulnerabilities.
By implementing structured guidelines through tools and frameworks like STIGs (Security Technical Implementation Guides) and the NIST CS (National Institute of Standards and Technology Cyber Security) framework, organizations can maintain resilience against evolving threats while ensuring accountability and regulatory alignment.
This chapter will present critical knowledge in implementing security controls in information systems.
Learning Objectives
By the end of Unit 1 students will have foundational knowledge and skills of the concepts below:
- Security Frameworks such as STIGs, CIS Controls, NIST Cybersecurity Framework
- Regulatory Compliance and Industry Standards when administering and building systems
- Skills and concepts in interacting with STIG remediation processes
- Understanding Risk Management and concepts surrounding risk vectors to organizations
- STIG Remediation and documentation skills
Relevance & Context
As the shepherds of sensitive data and systems, it is the ethical and legal duty of individuals that administer and build these systems to protect them from malicious actors with no regard for propriety. To be successful in securing systems students will need to thoroughly understand the cybersecurity landscape, its myriad potential threats, and the tools engineers and administrators have at their disposal.
The concepts presented in this unit play a pivotal role in organizing and structuring a resilient security posture against threats to enterprise and organizational entities. They provide processes and procedures that engineers and administrators can implement to significantly reduce the attack surface of the systems they administer along with building a system of logging and documentation in the eventuality of a security incident.
By thoroughly understanding these concepts students will be armed with a set of tools in the eternal and ever evolving landscape of cybersecurity.
Prerequisites
Students should have a strong understanding of such skills as presented in the Linux Administration Course including:
- The Command Line Interface and BASH shell skills
- Installing and Updating Linux System Packages
- Interacting with command line tools such as:
systemctl,mount,grep, andss - Ability to interact with basic SQL queries using MariaDB
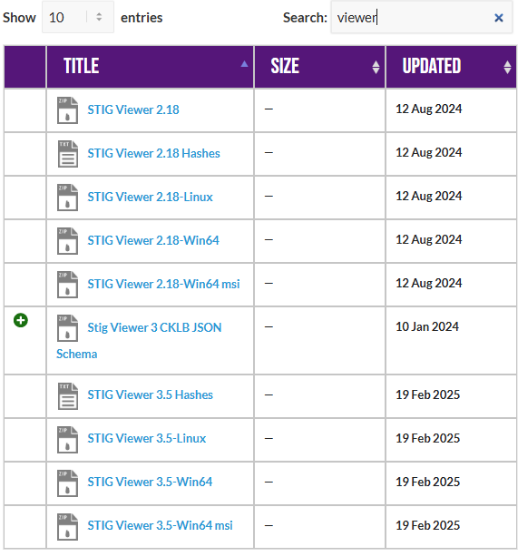
- Students will need to download the latest STIG viewer, v2.18
Key terms and Definitions
CIA Triad
Regulatory Compliance
HIPAA
Industry Standards
PCI/DSS
Security Frameworks
CIS
STIG
Instructions
Fill out this sheet as you progress through the lab and discussions. Hold your worksheets until the end to turn them in as a final submission packet.
Resources / Important Links
- https://public.cyber.mil/stigs/downloads
- https://excalidraw.com
- https://www.open-scap.org
- https://www.sans.org/information-security-policy
- https://www.sans.org/blog/the-ultimate-list-of-sans-cheat-sheets
Downloads
The worksheet has been provided below. The document(s) can be transposed to
the desired format so long as the content is preserved. For example, the .txt
could be transposed to a .md file.
Unit 1 Recording
Discussion Post #1
The first question of this course is, "What is Security?"
- Describe the CIA Triad.
- What is the relationship between Authority, Will, and Force as they relate to security?
- What are the types of controls and how do they relate to the above question?
Discussion Post #2
Find a STIG or compliance requirement that you do not agree is necessary for a server or service build.
- What is the STIG or compliance requirement trying to do?
- What category and type of control is it?
- Defend why you think it is not necessary. (What type of defenses do you think you could present?)
Submit your input by following the link below.
The discussion posts are done in Discord threads. Click the 'Threads' icon on the top right and search for the discussion post.
Definitions
CIA Triad:
Regulatory Compliance:
HIPAA:
Industry Standards:
PCI/DSS:
Security Frameworks:
CIS:
STIG:
Digging Deeper
-
Research a risk management framework. https://csrc.nist.gov/projects/risk-management/about-rmf
- What are the areas of concern for risk management?
-
Research the difference between quantitative and qualitative risks.
- Why might you use one or the other?
-
Research ALE, SLE, and ARO.
- What are these terms in relation to?
- How do these help in the risk discussion?
Reflection Questions
-
What questions do you still have about this week?
-
How are you going to use what you've learned in your current role?
If you are unable to finish the lab in the ProLUG lab environment we ask you
rebootthe machine from the command line so that other students will have the intended environment.
Required Materials
Putty or other connection tool Lab Server
Root or sudo command access
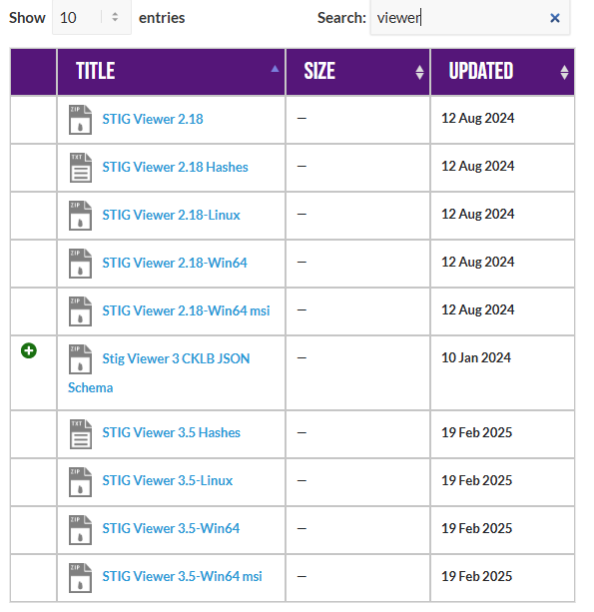
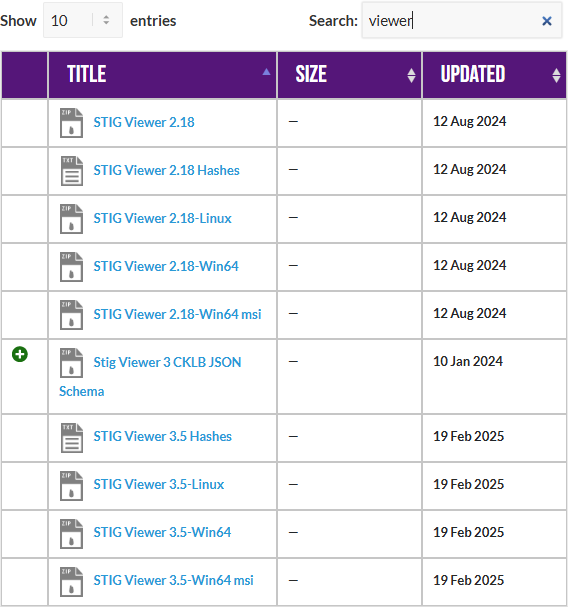
STIG Viewer 2.18 (download from https://public.cyber.mil/stigs/downloads/ )
Downloads
The lab has been provided below. The document(s) can be transposed to
the desired format so long as the content is preserved. For example, the .txt
could be transposed to a .md file.
Module 1: Exploring System Information
Exercise 1.1: Familiarizing ourselves with the System
mount | grep -i noexec

mount | grep -i nodev

mount | grep -i nosuid

# Approximately how many of your mounted filesystems have each of these values?
Exercise 1.2: Checking Mounted Systems
sysctl -a | grep -i ipv4

sysctl -a | grep -i ipv6

# How many of each are there?
sysctl -a | grep -i ipv4 | grep -i forward

# Does IPv4 forward on interfaces?
lsmod | grep -i tables

# What type of tables exist?
Module 2: PreLAB
-
Download the STIG Viewer 2.18 from - https://public.cyber.mil/stigs/downloads/
-
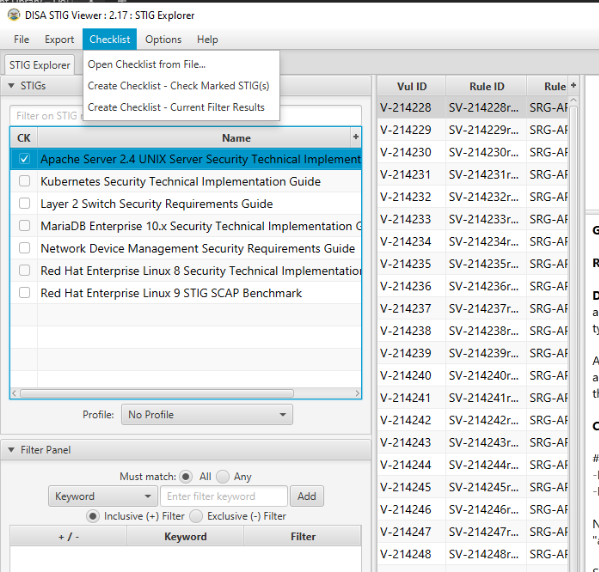
Download the STIG for Mariadb and the import it into your STIG viewer.

Module 3: Lab
This lab is designed to have the engineer practice securing a Linux server or service
against a set of configuration standards.
These standards are sometimes called benchmarks, checklists, or guidelines.
The engineer will be using STIG Viewer 2.18 to complete this lab.
MariaDB Service configuration:
- Connect to a hammer server.
- Install MariaDB.
dnf install mariadb-server

# Ensure that it is running

systemctl start mariadb

systemctl status mariadb

ss -ntulp | grep 3306
-
Check and remediate v-253666 STIG.
- What is the problem?
- What is the fix?
- What type of control is being implemented?
- Is it set properly on your system?
Connect to MariaDB locally.
mysqlRun the SQL command in the STIG's Fix Text section:
SELECT user, max_user_connections FROM mysql.user;Can you remediate this finding?
-
Check and remediate
v-253677 STIG- What is the problem?
- What is the fix?
- What type of control is being implemented?
- Is it set properly on your system?
-
Check and remediate
v-253678 STIG- What is the problem?
- What is the fix?
- What type of control is being implemented?
- Is it set properly on your system?
-
Check and remediate
v-253734 STIG- What is the problem?
- What is the fix?
- What type of control is being implemented?
- Is it set properly on your system?
Be sure to
rebootthe lab machine from the command line when you are done.
Overview
Understanding and implementing network standards and compliance measures can make security controls of critical importance very effective.
This unit introduces foundational knowledge on analyzing, configuring, and hardening networking components using tools and frameworks like STIGs, OpenSCAP, and DNS configurations.
Learning Objectives
By the end of Unit 2 students will have foundational knowledge and skills of the concepts below:
- Identifying and analyzing STIGs related to Linux networking.
- Understand and configure secure name resolution using nsswitch.conf and DNS.
- Utilizing tools like tcpdump, ngrep, ss, and netstat to monitor network behavior.
- Applying OpenSCAP and SCC tools for network compliance assessments.
- Exploring known network-based exploits and understanding their anatomy via the Diamond Model of Intrusion Analysis.
Relevance and Context
Networks represent one of the most common attack vectors in enterprise systems. Misconfigured name resolution, open ports, and insecure protocols are all doorways to intrusion. As system engineers, building resilient systems requires a deep understanding of how data flows through these pathways and what tools can monitor and secure them.
By learning to assess and remediate network-related STIGs and implementing structured standards, students will gain the skills to reduce ingress risk and respond effectively to threats. These skills are not only crucial for compliance but also for real-world defense.
Prerequisites
To be successful, students should have a working understanding of skills and tools including:
- The Command Line Interface and BASH shell skills
- Installing and Updating Linux System Packages
- Network concepts including TCP/IP, DNS, and more
- Interacting with command line tools such as:
sysctl,firewalld,grep, andoscap - Ability to edit files with
vim - Students will need to download the latest STIG viewer, v2.18
Key Terms and Definitions
sysctl
nsswitch.conf
DNS
Openscap
CIS Benchmarks
ss/netstat
tcpdump
ngrep
Instructions
Fill out this sheet as you progress through the lab and discussions. Hold your worksheets until the end to turn them in as a final submission packet.
Resources / Important Links
- https://www.sans.org/information-security-policy/
- https://www.sans.org/blog/the-ultimate-list-of-sans-cheat-sheets/
- https://docs.rockylinux.org/gemstones/core/view_kernel_conf/
- https://ciq.com/blog/demystifying-and-troubleshooting-name-resolution-in-rocky-linux/
- https://www.activeresponse.org/wp-content/uploads/2013/07/diamond.pdf
Downloads
The worksheet has been provided below. The document(s) can be transposed to
the desired format so long as the content is preserved. For example, the .txt
could be transposed to a .md file.
Unit 2 Recording
Discussion Post #1
There are 401 stigs for RHEL 9. If you filter in your STIG viewer for
sysctl there are 33 (mostly network focused), ssh - 39, and network - 58. Now there are
some overlaps between those, but review them and answer these questions
- As systems engineers why are we focused on protecting the network portion of our server builds?
- Why is it important to understand all the possible ingress points to our servers that
exist?
- Why is it so important to understand the behaviors of processes that are connecting on those ingress points?
Discussion Post #2
Read this: https://ciq.com/blog/demystifying-and-troubleshooting-name-resolution-in-rocky-linux/ or similar blogs on DNS and host file configurations.
-
What is the significance of the nsswitch.conf file?
-
What are security problems associated with DNS and common exploits? (May have to look into some more blogs or posts for this)
The discussion posts are done in Discord threads. Click the 'Threads' icon on the top right and search for the discussion post.
Definitions
sysctl:
nsswitch.conf:
DNS:
Openscap:
CIS Benchmarks:
ss/netstat:
tcpdump:
ngrep:
Digging Deeper
- See if you can find any DNS exploits that have been used and written up in the diamond model of intrusion analysis format. If you can, what are the primary actors and actions that made up the attack?
Reflection Questions
-
What questions do you still have about this week?
-
How are you going to use what you've learned in your current role?
If you are unable to finish the lab in the ProLUG lab environment we ask you
rebootthe machine from the command line so that other students will have the intended environment.
Required Materials
Putty or other connection tool Lab Server
Root or sudo command access
STIG Viewer 2.18 (download from https://public.cyber.mil/stigs/downloads/)
Downloads
The lab has been provided below. The document(s) can be transposed to
the desired format so long as the content is preserved. For example, the .docx
could be transposed to a .md file.
Pre-Lab Warm-Up
EXERCISES (Warmup to quickly run through your system and familiarize yourself)
sysctl -a | grep -i ipv4 | grep -i forward
# Does this system appear to be set to forward? Why or why not?

sysctl -a | grep -i ipv4 | grep -i martian
# What are martians and is this system allowing them?

sysctl -a | grep -i panic
# How does this system handle panics?

sysctl -a | grep -i crypto
# What are the settings you see? Is FIPS enabled?

cat /proc/cmdline
fips-mode-setup --check
sestatus
cat /etc/selinux/config
What information about the security posture of the system can you see here?
Can you verify SELINUX status?
Can you verify FIPS status?
Download the STIG Viewer 2.18 from - https://public.cyber.mil/stigs/downloads/

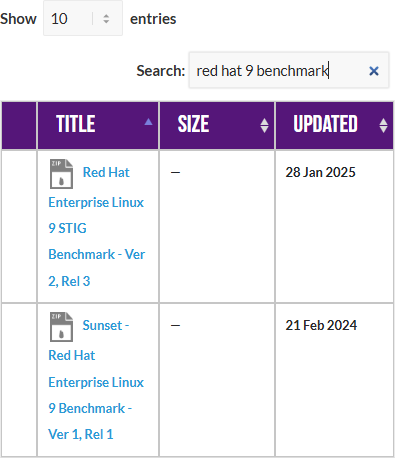
Download the STIG for RHEL 9 and the import it into your STIG viewer

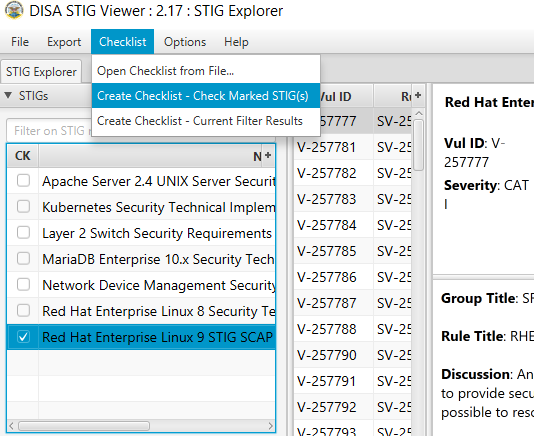
Create a checklist from the opened STIG for RHEL 9

Lab 🧪
This lab is designed to have the engineer practice securing a Linux server or service against a set of configuration standards. These standards are sometimes called benchmarks, checklists, or guidelines. The engineer will be using STIG Viewer 2.18 to complete this lab.
Network Service configuration
Connect to a hammer server
Filter by ipv4 and see how many STIGs you have.
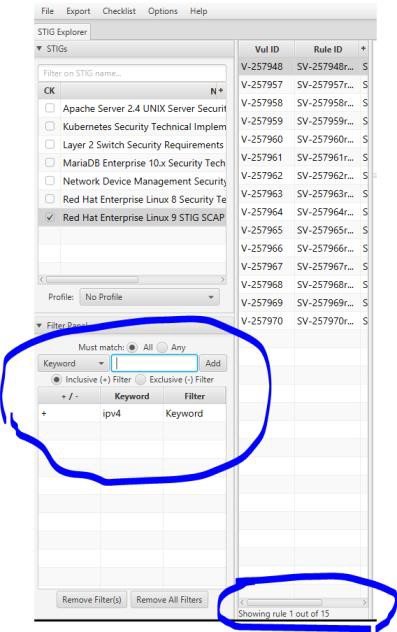
Examine STIG V-257957
What is the problem?
What is the fix?
What type of control is being implemented?
Is it set properly on your system?
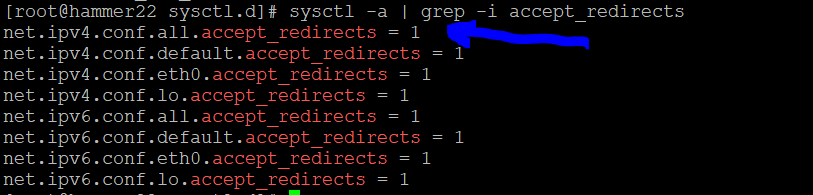
sysctl -a | grep -i ipv4 | grep -i syncookies

Can you remediate this finding?
In this case it's already correctly set.
But if we needed to, we would set that value in /etc/sysctl.d/00- remediate.conf
And then reload sysctl with sysctl --system
Check and remediate V-257958 STIG
What is the problem?
What is the fix?
What type of control is being implemented?
Is it set properly on your system?
How would you go about remediating this on your system?
Check and remediate V-257960 and V-257961 STIGs
What is the problem? How are they related?
What is the fix?
What type of control is being implemented?
Is it set properly on your system?
Filter by firewall
How many STIGS do you see?
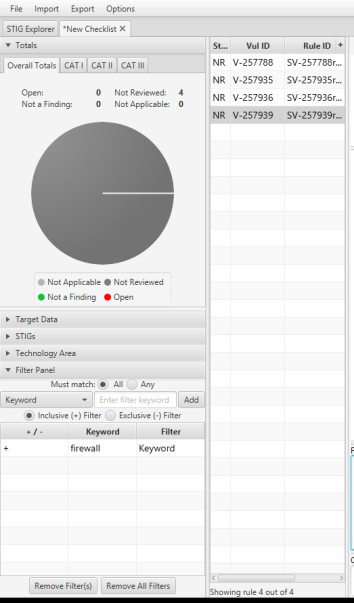
What do these STIGS appear to be trying to do? What types of controls are they?
Firewall port exposure
Scenario:
Your team needs to use node_exporter with Prometheus to allow scraping of system information back to your network monitoring solution. You are running a firewall, so you need to expose the port that node_exporter runs on to the network outside of your system.
Expose a network port through your firewall
# Verify that your firewall is running
systemctl status firewalld

# Verify that your firewall has the service defined
firewall-cmd --get-services | grep -i node
ls /usr/lib/firewalld/services | grep -i node

# Verify that the service is not currently enabled for node_exporter
firewall-cmd --list-services

# Examine the structure of the firewall .xml file
cat /usr/lib/firewalld/services/prometheus-node-exporter.xml

# Enable the service through your firewall
firewall-cmd --permanent --add-service=prometheus-node-exporter

# Reload so the changes take effect
firewall-cmd --reload

# Verify that the service is currently enabled for node_exporter
firewall-cmd --list-services
Automate STIG remediation on a system
There are many options and the STIG remediation steps are well known. Here the learner will examine a few ways to generate Ansible and Shell fixes to your system. Then one can apply all of them, or just some of them. This is the real value of a security engineer focused Linux engineer, the trade-off between security and productivity.
Download and extract a STIG remediation tool
/labs folder on the server for a [course]_[unit#].zip file to complete the activities.
cd /root
mkdir stigs
cd stigs
wget -O U_RHEL_9_V2R4_STIG_Ansible.zip https://dl.dod.cyber.mil/wp-content/uploads/stigs/zip/U_RHEL_9_V2R4_STIG_Ansible.zip
unzip U_RHEL_9_V2R4_STIG_Ansible.zip
mkdir ansible
cp rhel9STIG-ansible.zip ansible/
cd ansible
unzip rhel9STIG-ansible.zip
Examine the default values for STIGS
cd /root/stigs/ansible/roles/rhel9STIG/defaults/
vim main.yml
Search for a few of the STIG numbers you used earlier and see their default values.
- use /257784 to search
Examine the playbook to see how those are applied in a running system.
vim /root/stigs/ansible/roles/rhel9STIG/tasks/main.yml
- use /257784 to search for the STIG from above and see how it is fixed in the playbook.
Create an Ansible playbook from OpenSCAP
dnf -y install openscap-scanner openscap-utils openscap-scanner scap-security-guide
cd /root
mkdir openscap
cd openscap

# Generate the Ansible
oscap xccdf generate fix --profile ospp --fix-type ansible /usr/share/xml/scap/ssg/content/ssg-rhel9-ds.xml > draft-disa-remediate.yml

# Examine the file
vim draft-disa-remediate.yml

# Generate a BASH version
oscap xccdf generate fix --profile ospp --fix-type bash /usr/share/xml/scap/ssg/content/ssg-rhel9-ds.xml > draft-disa-remediate.sh

# Examine the file
vim draf-disa-remediate.sh
Be sure to
rebootthe lab machine from the command line when you are done.
Overview
User access in an larger organizations requires more sophisticated controls. For this purpose Active Directory (AD) and Lightweight Directory Access Protocol (LDAP) have become popular choices as they offer more sophisticated and robust ways of controlling access. In this chapter, you will learn why AD and LDAP are popular choices.
Learning Objectives
- Understand how LDAP or AD works and why it is beneficial.
- High level understanding of hardening Rocky Linux, a RHEL adjacent distro.
- Gain a basic understanding of PAM.
Relevance and Context
In enterprise environments, managing user identities and system access at scale is critical for security, compliance, and operational efficiency. Lightweight Directory Access Protocol (LDAP) and Active Directory (AD) provide centralized authentication, authorization, and account management capabilities that far surpass local account management methods.
Understanding these systems is foundational for administrators working with Rocky Linux, a Red Hat Enterprise Linux (RHEL) derivative, especially when implementing compliance standards such as DISA STIGs or CIS Benchmarks. Mastering integration points like PAM (Pluggable Authentication Modules) and services like sssd allows administrators to ensure secure and scalable authentication across diverse systems.
Prerequisites
To be successful, students should have a working understanding of skills and tools including:
- Basic Directory navigation.
- Knowledge of editing config files.
- Basic knowledge of StigViewer.
- Understanding of SystemD services and the SysCTL command.
Key Terms and Definitions
PAM
AD
LDAP
sssd
oddjob
krb5
realm/realmd
wheel (system group in RHEL)
Instructions
Fill out this sheet as you progress through the lab and discussions. Hold your worksheets until the end to turn them in as a final submission packet.
Resources / Important Links
- https://www.sans.org/information-security-policy/
- https://www.sans.org/blog/the-ultimate-list-of-sans-cheat-sheets/
- https://docs.rockylinux.org/guides/security/pam/
- https://docs.rockylinux.org/guides/security/authentication/active_directory_authentication/
- https://docs.rockylinux.org/books/admin_guide/06-users/
Downloads
The worksheet has been provided below. The document(s) can be transposed to
the desired format so long as the content is preserved. For example, the .txt
could be transposed to a .md file.
Unit 3 Recording
Discussion Post #1
There are 16 Stigs that involve PAM for RHEL 9. Read the guide from Rocky Linux here: https://docs.rockylinux.org/guides/security/pam/
- What are the mechanisms and how do they affect PAM functionality?
- Review
/etc/pam.d/sshdon a Linux system.
What is happening in that file relative to these functionalities?
- Review
- What are the common PAM modules?
- Review
/etc/pam.d/sshdon a Linux system.
What is happening in that file relative to these functionalities?
- Review
- Look for a blog post or article about PAM that discusses real world application.
Post it here and give us a quick synopsis. (Bonus arbitrary points if you find one of our ProLUG members blogs on the subject.)
Discussion Post #2
Read about active directory (or LDAP) configurations of Linux via sssd here:
https://docs.rockylinux.org/guides/security/authentication/active_directory_authentication
- Why do we not want to just use local authentication in Linux? Or really any system?
- There are 4 SSSD STIGS.
- What are they?
- What do they seek to do with the system?
The discussion posts are done in Discord threads. Click the 'Threads' icon on the top right and search for the discussion post.
Definitions
PAM:
AD:
LDAP:
sssd:
oddjob:
krb5:
realm/realmd:
wheel (system group in RHEL):
Digging Deeper
- How does
/etc/security/access.confcome into play with pam_access? Read up on it here: https://man7.org/linux/man-pages/man8/pam_access.8.html- Can you find any other good resources?
- What is the structure of the access.conf file directives?
- What other important user access or user management information do you learn by
reading this? https://docs.rockylinux.org/books/admin_guide/06-users/
- What is the contents of the
/etc/login.defsfile? Why do you care?
- What is the contents of the
Reflection Questions
-
What questions do you still have about this week?
-
How are you going to use what you've learned in your current role?
If you are unable to finish the lab in the ProLUG lab environment we ask you
rebootthe machine from the command line so that other students will have the intended environment.
Required Materials
Putty or other connection tool Lab Server
Root or sudo command access
STIG Viewer 2.18 (download from https://public.cyber.mil/stigs/downloads/ )
Download the STIG for RHEL 9 and the import it into your STIG viewer
Create a checklist from the opened STIG for RHEL 9
Downloads
The lab has been provided below. The document(s) can be transposed to
the desired format so long as the content is preserved. For example, the .docx
could be transposed to a .md file.
EXERCISES (Warmup to quickly run through your system and familiarize yourself)
ls -l /etc/pam.d/
# What are the permissions and names of files? Can everyone read them?

cat /etc/pam.d/sshd

# What information do you see in this file?
# Does any of it look familiar to you?
Pre-Lab Warm-Up
Download the STIG Viewer 2.18 from - https://public.cyber.mil/stigs/downloads/
Download the STIG for RHEL 9 and the import it into your STIG viewer
Create a checklist from the opened STIG for RHEL 9
Lab 🧪
This lab is designed to have the engineer practice securing a Linux server or service against a set of configuration standards. These standards are sometimes called benchmarks, checklists, or guidelines. The engineer will be using STIG Viewer 2.18 to complete this lab.
PAM configuration
Connect to a hammer server
Filter by pam and see how many STIGS you have. (Why is it really only 16?)
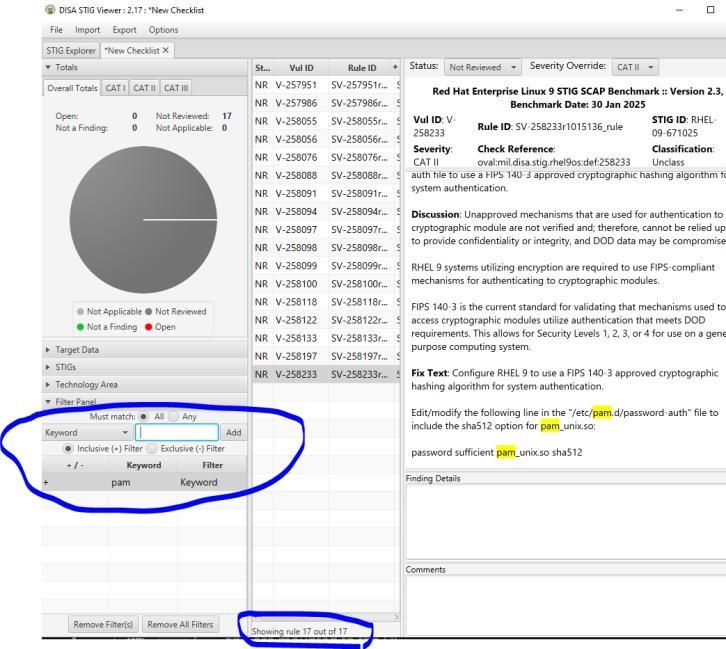
Examine STIG V-257986
What is the problem?
What is the fix?
What type of control is being implemented?
Is it set properly on your system?
grep -i pam /etc/ssh/sshd_config
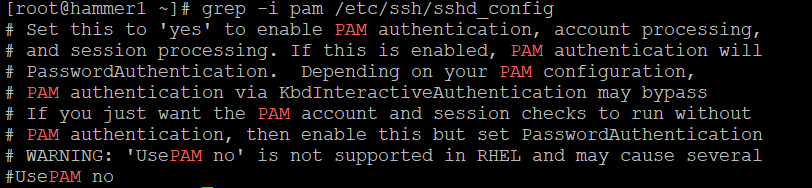
Can you remediate this finding?
Check and remediate STIG V-258055
What is the problem?
What is the fix?
What type of control is being implemented?
Are there any major implications to think about with this change on your system? Why or why not?
Is it set properly on your system?
How would you go about remediating this on your system?
Check and remediate STIG V-258098
What is the problem?
What is the fix?
What type of control is being implemented?
Is it set properly on your system?
Filter by "password complexity"
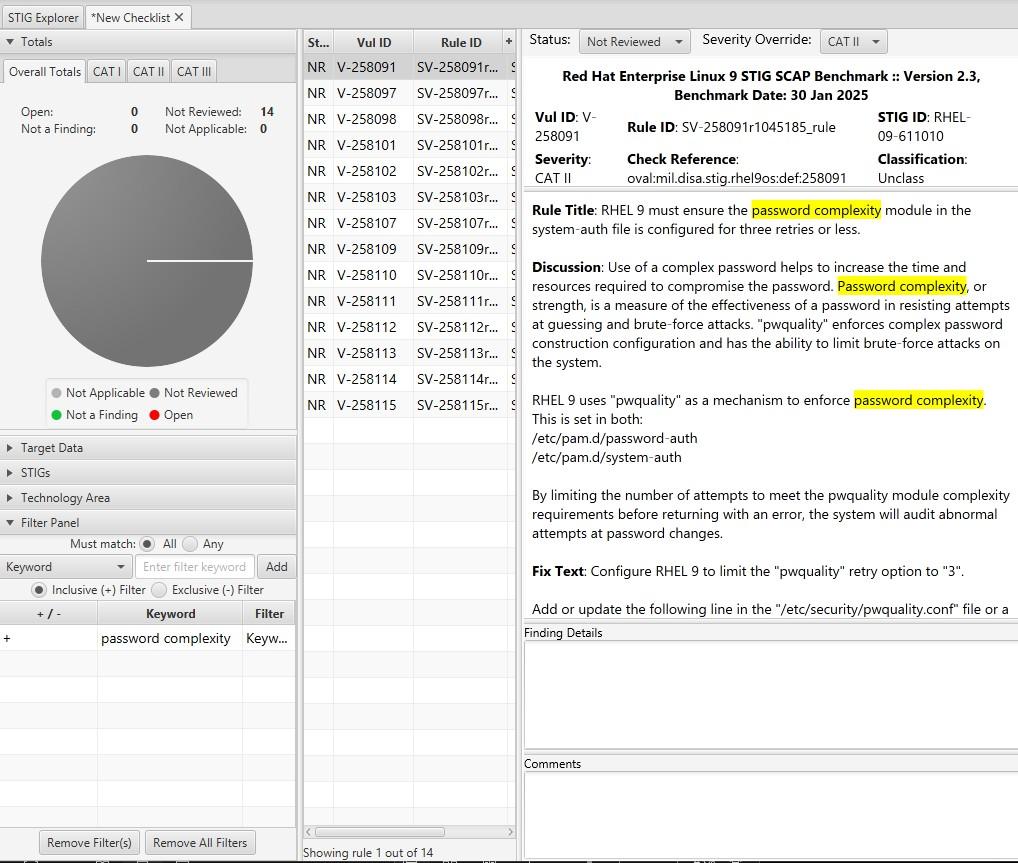
How many are there?
What are the password complexity rules?
Are there any you haven't seen before?
Filter by sssd
How many STIGS do you see?
What do these STIGS appear to be trying to do? What types of controls are they?
OpenLDAP Setup
You will likely not build an LDAP server in a real world environment. We are doing it for understanding and ability to complete the lab. In a normal corporate environment this is likely Active Directory.
To simplify some of the typing in this lab, there is a file located at
/lab_work/identity_and_access_management.tar.gz that you can pull down to your system with the correct .ldif files.
[root@hammer1 ~]# cp /lab_work/identity_and_access_management.tar.gz .
[root@hammer1 ~]# tar -xzvf identity_and_access_management.tar.gz
Install and configure OpenLDAP
1. Stop the warewulf client
[root@hammer1 ~]# systemctl stop wwclient
2. Edit your /etc/hosts file
Look for and edit the line that has your current server
[root@hammer1 ~]# vi /etc/hosts
Entry for hammer1 for example:
192.168.200.151 hammer1 hammer1-default ldap.prolug.lan ldap
3. Setup dnf repo
[root@hammer1 ~]# dnf config-manager --set-enabled plus
[root@hammer1 ~]# dnf repolist
[root@hammer1 ~]# dnf -y install openldap-servers openldap-clients openldap
4. Start slapd systemctl
[root@hammer1 ~]# systemctl start slapd
[root@hammer1 ~]# ss -ntulp | grep slapd
5. Allow ldap through the firewall
[root@hammer1 ~]# firewall-cmd --add-service={ldap,ldaps} --permanent
[root@hammer1 ~]# firewall-cmd --reload
[root@hammer1 ~]# firewall-cmd --list-all
6. Generate a password (Our example uses testpassword) This will return a salted SSHA password. Save this password and salted hash for later input
[root@hammer1 ~]# slappasswd
Output:
New password:
Re-enter new password:
{SSHA}wpRvODvIC/EPYf2GqHUlQMDdsFIW5yig
7. Change the password
[root@hammer1 ~]# vi changerootpass.ldif
dn: olcDatabase={0}config,cn=config
changetype: modify
replace: olcRootPW
olcRootPW: {SSHA}vKobSZO1HDGxp2OElzli/xfAzY4jSDMZ
[root@hammer1 ~]# ldapadd -Y EXTERNAL -H ldapi:/// -f changerootpass.ldif
Output:
SASL/EXTERNAL authentication started
SASL username: gidNumber=0+uidNumber=0,cn=peercred,cn=external,cn=auth
SASL SSF: 0
modifying entry "olcDatabase={0}config,cn=config"
8. Generate basic schemas
ldapadd -Y EXTERNAL -H ldapi:/// -f /etc/openldap/schema/cosine.ldif
ldapadd -Y EXTERNAL -H ldapi:/// -f /etc/openldap/schema/nis.ldif
ldapadd -Y EXTERNAL -H ldapi:/// -f /etc/openldap/schema/inetorgperson.ldif
9. Set up the domain (USE THE PASSWORD YOU GENERATED EARLIER)
[root@hammer1 ~]# vi setdomain.ldif
dn: olcDatabase={1}monitor,cn=config
changetype: modify
replace: olcAccess
olcAccess: {0}to * by dn.base="gidNumber=0+uidNumber=0,cn=peercred,cn=external,cn=auth"
read by dn.base="cn=Manager,dc=prolug,dc=lan" read by * none

dn: olcDatabase={2}mdb,cn=config
changetype: modify
replace: olcSuffix
olcSuffix: dc=prolug,dc=lan

dn: olcDatabase={2}mdb,cn=config
changetype: modify
replace: olcRootDN
olcRootDN: cn=Manager,dc=prolug,dc=lan

dn: olcDatabase={2}mdb,cn=config
changetype: modify
add: olcRootPW
olcRootPW: {SSHA}s4x6uAxcAPZN/4e3pGnU7UEIiADY0/Ob

dn: olcDatabase={2}mdb,cn=config
changetype: modify
add: olcAccess
olcAccess: {0}to attrs=userPassword,shadowLastChange by
dn="cn=Manager,dc=prolug,dc=lan" write by anonymous auth by self write by * none
olcAccess: {1}to dn.base="" by * read
olcAccess: {2}to * by dn="cn=Manager,dc=prolug,dc=lan" write by * read
10. Run it
[root@hammer1 ~]# ldapmodify -Y EXTERNAL -H ldapi:/// -f setdomain.ldif
Output:
SASL/EXTERNAL authentication started
SASL username: gidNumber=0+uidNumber=0,cn=peercred,cn=external,cn=auth
SASL SSF: 0
modifying entry "olcDatabase={1}monitor,cn=config"
modifying entry "olcDatabase={2}mdb,cn=config"
modifying entry "olcDatabase={2}mdb,cn=config"
modifying entry "olcDatabase={2}mdb,cn=config"
modifying entry "olcDatabase={2}mdb,cn=config"
11. Search and verify the domain is working.
[root@hammer1 ~]# ldapsearch -H ldap:// -x -s base -b "" -LLL "namingContexts"
Output:
dn:
namingContexts: dc=prolug,dc=lan
12. Add the base group and organization.
[root@hammer1 ~]# vi addou.ldif
dn: dc=prolug,dc=lan
objectClass: top
objectClass: dcObject
objectclass: organization
o: My prolug Organisation
dc: prolug

dn: cn=Manager,dc=prolug,dc=lan
objectClass: organizationalRole
cn: Manager
description: OpenLDAP Manager

dn: ou=People,dc=prolug,dc=lan
objectClass: organizationalUnit
ou: People

dn: ou=Group,dc=prolug,dc=lan
objectClass: organizationalUnit
ou: Group
[root@hammer1 ~]# ldapadd -x -D cn=Manager,dc=prolug,dc=lan -W -f addou.ldif
13. Verifying
[root@hammer1 ~]# ldapsearch -H ldap:// -x -s base -b "" -LLL "+"
[root@hammer1 ~]# ldapsearch -x -b "dc=prolug,dc=lan" ou
14. Add a user
Generate a password (use testuser1234)
[root@hammer1 ~]# slappasswd
[root@hammer1 ~]# vi adduser.ldif
dn: uid=testuser,ou=People,dc=prolug,dc=lan
objectClass: inetOrgPerson
objectClass: posixAccount
objectClass: shadowAccount
cn: testuser
sn: temp
userPassword: {SSHA}yb6e0ICSdlZaMef3zizvysEzXRGozQOK
loginShell: /bin/bash
uidNumber: 15000
gidNumber: 15000
homeDirectory: /home/testuser
shadowLastChange: 0
shadowMax: 0
shadowWarning: 0

dn: cn=testuser,ou=Group,dc=prolug,dc=lan
objectClass: posixGroup
cn: testuser
gidNumber: 15000
memberUid: testuser
[root@hammer1 ~]# ldapadd -x -D cn=Manager,dc=prolug,dc=lan -W -f adduser.ldif
16. Verify that your user is in the system.
[root@hammer1 ~]# ldapsearch -x -b "ou=People,dc=prolug,dc=lan"
17. Secure the system with TLS (accept all defaults)
[root@hammer1 ~]# openssl req -x509 -nodes -days 365 -newkey rsa:2048 -keyout /etc/pki/tls/ldapserver.key -out /etc/pki/tls/ldapserver.crt
[root@hammer1 ~]# chown ldap:ldap /etc/pki/tls/{ldapserver.crt,ldapserver.key}
[root@hammer1 ~]# ls -l /etc/pki/tls/ldap*
Output:
-rw-r--r--. 1 ldap ldap 1224 Apr 12 18:23 /etc/pki/tls/ldapserver.crt
-rw-------. 1 ldap ldap 1704 Apr 12 18:22 /etc/pki/tls/ldapserver.key
[root@hammer1 ~]# vi tls.ldif
dn: cn=config
changetype: modify
add: olcTLSCACertificateFile
olcTLSCACertificateFile: /etc/pki/tls/ldapserver.crt

add: olcTLSCertificateKeyFile
olcTLSCertificateKeyFile: /etc/pki/tls/ldapserver.key

add: olcTLSCertificateFile
olcTLSCertificateFile: /etc/pki/tls/ldapserver.crt
[root@hammer1 ~]# ldapadd -Y EXTERNAL -H ldapi:/// -f tls.ldif
18. Fix the /etc/openldap/ldap.conf to allow for certs
[root@hammer1 ~]# vi /etc/openldap/ldap.conf
#
# LDAP Defaults
#

# See ldap.conf(5) for details
# This file should be world readable but not world writable.

#BASE dc=example,dc=com
#URI ldap://ldap.example.com ldap://ldap-master.example.com:666

#SIZELIMIT 12
#TIMELIMIT 15
#DEREF never

# When no CA certificates are specified the Shared System Certificates
# are in use. In order to have these available along with the ones specified # by TLS_CACERTDIR one has to include them explicitly:

TLS_CACERT /etc/pki/tls/ldapserver.crt
TLS_REQCERT never

# System-wide Crypto Policies provide up to date cipher suite which should
# be used unless one needs a finer grinded selection of ciphers. Hence, the
# PROFILE=SYSTEM value represents the default behavior which is in place
# when no explicit setting is used. (see openssl-ciphers(1) for more info)
#TLS_CIPHER_SUITE PROFILE=SYSTEM

# Turning this off breaks GSSAPI used with krb5 when rdns = false
SASL_NOCANON on
[root@hammer1 ~]# systemctl restart slapd
SSSD Configuration and Realmd join to LDAP
SSSD can connect a server to a trusted LDAP system and authenticate users for access to local resources. You will likely do this during your career and it is a valuable skill to work with.
1. Install sssd, configure, and validate that the user is seen by the system
[root@hammer1 ~]# dnf install openldap-clients sssd sssd-ldap oddjob-mkhomedir authselect
[root@hammer1 ~]# authselect select sssd with-mkhomedir --force
[root@hammer1 ~]# systemctl enable --now oddjobd.service
[root@hammer1 ~]# systemctl status oddjobd.service
2. Uncomment and fix the lines in /etc/openldap/ldap.conf
[root@hammer1 ~]# vi /etc/openldap/ldap.conf
Output:
BASE dc=prolug,dc=lan
URI ldap://ldap.ldap.lan/
3. Edit the sssd.conf file
[root@hammer1 ~]# vi /etc/sssd/sssd.conf
[domain/default]
id_provider = ldap
autofs_provider = ldap
auth_provider = ldap
chpass_provider = ldap
ldap_uri = ldap://ldap.prolug.lan/
ldap_search_base = dc=prolug,dc=lan
#ldap_id_use_start_tls = True
#ldap_tls_cacertdir = /etc/openldap/certs
cache_credentials = True
#ldap_tls_reqcert = allow

[sssd]
services = nss, pam, autofs
domains = default

[nss]
homedir_substring = /home
[root@hammer1 ~]# chmod 0600 /etc/sssd/sssd.conf
[root@hammer1 ~]# systemctl start sssd
[root@hammer1 ~]# systemctl status sssd
4. Validate that the user can be seen
[root@hammer1 ~]# id testuser
Output:
uid=15000(testuser) gid=15000 groups=15000
Congratulations! Look at you, doing all the Linux.
Please reboot the the lab machine when done.
[root@hammer1 ~]# reboot
Overview
Bastions and airgaps are strategies for controlling how systems connect—or don't connect—to the outside world. They focus on limiting exposure, creating strong boundaries that support a broader security design. In this unit, we look at how we can seperate systems and create safe disconnects should a problem arise.
Learning Objectives
- Understand the role and importance of air-gapped systems.
- Recognize how to balance strong security with operational efficiency.
- Learn how bastion hosts can help control and limit system access.
- Understand methods for automating the jailing and restriction of users.
- Gain a foundational understanding of
chrootenvironments and diversion techniques.
Relevance and Context
As organizations grow, protecting critical systems becomes more challenging. Air-gapped systems and bastion hosts offer proven ways to limit exposure and manage access securely. Understanding these concepts is essential for building strong security foundations without creating unnecessary barriers to operations.
Prerequisites
To be successful, students should have a working understanding of skills and tools including:
- Basic directory navigation skills.
- Ability to edit and manage configuration files.
- Understanding of SystemD services and the use of the
sysctlcommand. - Basic knowledge of Bash scripting.
Key Terms and Definitions
Air-gapped
Bastion
Jailed process
Isolation
Ingress
Egress
Exfiltration
Cgroups
Namespaces
- Mount
- PID
- IPC
- UTS
Instructions
Fill out this sheet as you progress through the lab and discussions. Hold your worksheets until the end to turn them in as a final submission packet.
Resources / Important Links
- https://www.sans.org/information-security-policy/
- https://www.sans.org/blog/the-ultimate-list-of-sans-cheat-sheets/
- https://aws.amazon.com/search/?searchQuery=air+gapped#facet_type=blogs&page=1
- https://aws.amazon.com/blogs/security/tag/bastion-host/
Downloads
The worksheet has been provided below. The document(s) can be transposed to
the desired format so long as the content is preserved. For example, the .txt
could be transposed to a .md file.
Unit 4 Recording
Discussion Post #1
Review some of the blogs here:
Or find some on your own about air-gapped systems.
- What seems to be the theme of air-gapped systems?
- What seems to be their purpose?
- If you use google, or an AI, what are some of the common themes that come up when asked about air-gapped or bastion systems?
Discussion Post #2
Do a Google or AI search of topics around jailing a user or processes in Linux.
- Can you enumerate the methods of jailing users?
- Can you think of when you've been jailed as a Linux user?
If not, can you think of the useful ways to use a jail?
The discussion posts are done in Discord threads. Click the 'Threads' icon on the top right and search for the discussion post.
Definitions
Air-gapped
Bastion
Jailed process
Isolation
Ingress
Egress
Exfiltration
Cgroups
Namespaces
- Mount
- PID
- IPC
- UTS
Digging Deeper
-
While this isn't, strictly speaking, an automation course there is some value in looking at automation of the bastion deployments. Check out this ansible code:
https://github.com/het-tanis/stream_setup/blob/master/roles/bastion_deploy/tasks/main.yml- Does the setup make sense to you with our deployment?
- What can improve and make this better?
-
Find a blog or github where someone else deploys a bastion. Compare it to our process.
-
Knowing what you now know about bastions, jails, and air-gapped systems. Reflect on the first 3 weeks, all the STIGs you've reviewed and touched. Do any of them seem moot, or less necessary if applied in an air-gapped environment?
- Does your answer change if you read about Zero Trust and know how much of a hot
topic that is in the security world now?
- Why or why not?
- Does your answer change if you read about Zero Trust and know how much of a hot
topic that is in the security world now?
-
Think of a Linux system where you would like to deploy a bastion (If you cannot think of one, use ProLUG Lab). Draw out how you think the system works in excalidraw.com.
Reflection Questions
-
Does it matter if the user knows that they are jailed? Why or why not?
-
What questions do you still have about this week?
-
How are you going to use what you've learned in your current role?
If you are unable to finish the lab in the ProLUG lab environment we ask you
rebootthe machine from the command line so that other students will have the intended environment.
Required Materials
Putty or other connection tool Lab Server
Root or sudo command access
STIG Viewer 2.18 (download from https://public.cyber.mil/stigs/downloads/ )
Downloads
The lab has been provided below. The document(s) can be transposed to
the desired format so long as the content is preserved. For example, the .txt
could be transposed to a .md file.
PreLAB
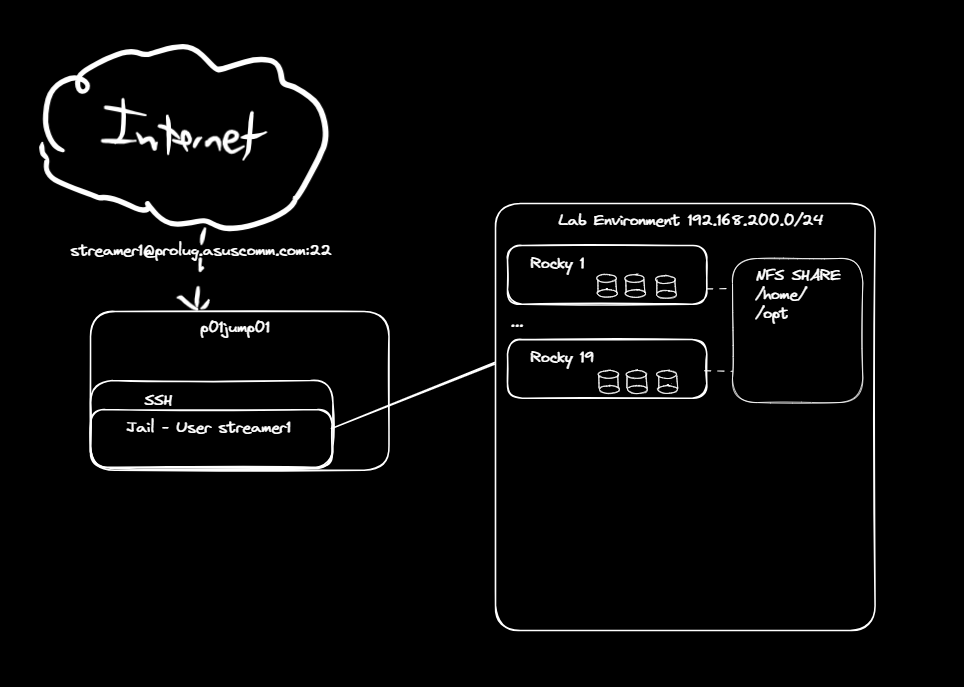
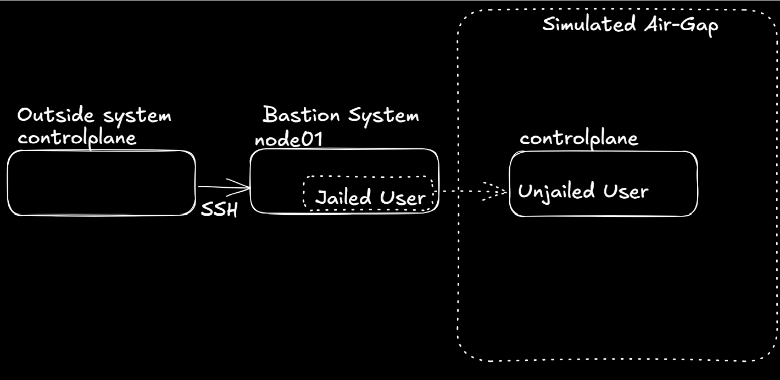
Review lab diagram for the Bastion design.
LAB
This lab is designed to have the engineer practice securing a Linux environment by the use of bastion hosts and jailing users as they enter an air-gapped environment.
Jailing a User
-
Follow the lab here answering the questions below as you progress: https://killercoda.com/het-tanis/course/Linux-Labs/204-building-a-chroot-jail
-
If you were to write out the high level steps of building a chroot jail, what would they be?
-
Think about what you did in the lab and what extra (or less) you might give a user/process.
- What directories are needed?
- What executables might you give the jailed user/process?
- If you give an executable, why is it important to give the link libraries that it uses?
- What are the special files that you made with mknod and why must they be there? (try removing them or redoing the lab without them. How does it break?)
Building a Bastion
-
Follow the lab here: https://killercoda.com/het-tanis/course/Linux-Labs/210-building-a-bastion-host
-
If you were to write out the high level steps of building a bastion host, what would they be?
-
When you jump into the bastion host, do you have any options other than the one you have given yourself?
-
How did you test that you couldn't leave the jailed environment?
- How effective do you think this is as a technical preventative control against user breakout in the jail, having a 20 second timeout?
Digging Deeper challenge (not required for finishing lab)
-
Fix the drawing from the lab with excalidraw and properly replace it here: https://github.com/het-tanis/prolug-labs/tree/main/Linux-Labs/210-building-a-bastion-host
-
Do a pull request and get some github street cred or something.
Be sure to
rebootthe lab machine from the command line when you are done.
Overview
Where software originates—and how and when it is updated (patched)—is essential to maintaining system stability and security. Every patch applied to a system must come from a known and trusted source, as introducing changes into a stable environment can have significant consequences. Administrators and engineers ensure that patching is planned and scheduled using verified, trackable repositories and resources.
In this unit, we will examine how this process is implemented in adjacent distributions, where administrators can apply granular control to Red Hat Package Manager (RPM) packages and maintain internal repositories of vetted packages.
Learning Objectives
- Understand the importance of package integrity.
- Understand patching techniques and routines.
- Understanding automated methods of patching.
- Understanding custom internal package repositories.
Relevance and Context
For security engineers, controlling the origin and integrity of software updates is a foundational practice for minimizing attack surfaces. By managing internal repositories and applying strict control over RPM packages, organizations can enforce compliance, prevent supply chain attacks, and ensure only trusted, audited software enters production environments.
Prerequisites
To be successful, students should have a working understanding of skills and tools including:
- Basic directory navigation skills.
- Ability to edit and manage configuration files.
- Basic knowledge of STIG.
- Basic knowledge of Ansible.
Key Terms and Definitions
Patching
Repos
Software
- EPEL
- BaseOS v. Appstream (in RHEL/Rocky)
- Other types you can find?
httpd
patching
GPG Key
DNF/YUM
Instructions
Fill out this sheet as you progress through the lab and discussions. Hold your worksheets until the end to turn them in as a final submission packet.
Resources / Important Links
- https://public.cyber.mil/stigs/downloads/
- https://httpd.apache.org/
- https://docs.rockylinux.org/books/admin_guide/13-softwares/
- https://sig-core.rocky.page/documentation/patching/patching/
- https://wiki.rockylinux.org/rocky/repo/
- https://www.sans.org/information-security-policy/
- https://www.redhat.com/en/blog/whats-epel-and-how-do-i-use-it/
Downloads
The worksheet has been provided below. The document(s) can be transposed to
the desired format so long as the content is preserved. For example, the .txt
could be transposed to a .md file.
Unit 5 Recording
Discussion Post #1
Review the rocky documentation on Software management in Linux.
- What do you already understand about the process?
- What new things did you learn or pick up?
- What are the DNF plugins? What is the use of the versionlock plugin?
- What is an EPEL? Why do you need to consider this when using one?
Discussion Post #2
Do a google search for "patching enterprise Linux" and try to wade through all of the noise.
- What blogs (or AI) do you find that enumerates a list of steps or checklists to consider?
- After looking at that, how does patching a fleet of systems in the enterprise differ from pushing "update now" on your local desktop? What seems to be the major considerations? What seems to be the major roadblocks?
The discussion posts are done in Discord threads. Click the 'Threads' icon on the top right and search for the discussion post.
Definitions
Patching
Repos
Software
EPEL
BaseOS v. Appstream (in RHEL/Rocky)
Other types you can find?
- httpd
- patching
- GPG Key
- DNF/YUM
Digging Deeper
- After completing the lab and worksheet, draw out how you would deploy a software repository into your system. How are you going to update it? What tools do you find that are useful in this space?
Reflection Questions
-
Why is it that repos are controlled by root/admin functions and not any user, developer, or manager?
-
What questions do you still have about this week?
-
How are you going to use what you've learned in your current role?
If you are unable to finish the lab in the ProLUG lab environment we ask you
rebootthe machine from the command line so that other students will have the intended environment.
Required Materials
Putty or other connection tool Lab Server
Root or sudo command access
STIG Viewer 2.18 (download from https://public.cyber.mil/stigs/downloads/ )
Downloads
The lab has been provided below. The document(s) can be transposed to
the desired format so long as the content is preserved. For example, the .txt
could be transposed to a .md file.
PreLAB
Download the STIG Viewer 2.18 from - https://public.cyber.mil/stigs/downloads/
Download the STIG for Apache 2.4 and the import it into your STIG viewer
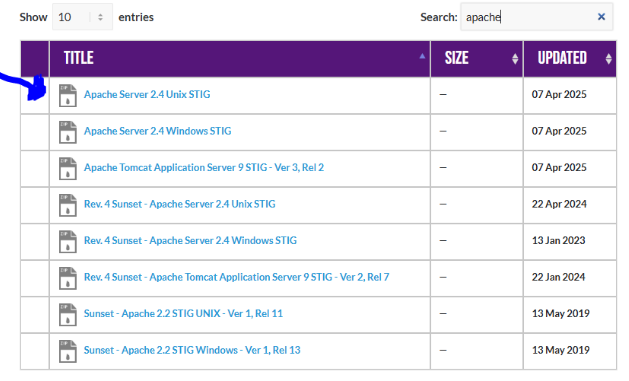
Create a checklist from the opened STIG for Apache 2.4
Review the software download process for Mellanox drivers:
Linux InfiniBand Drivers
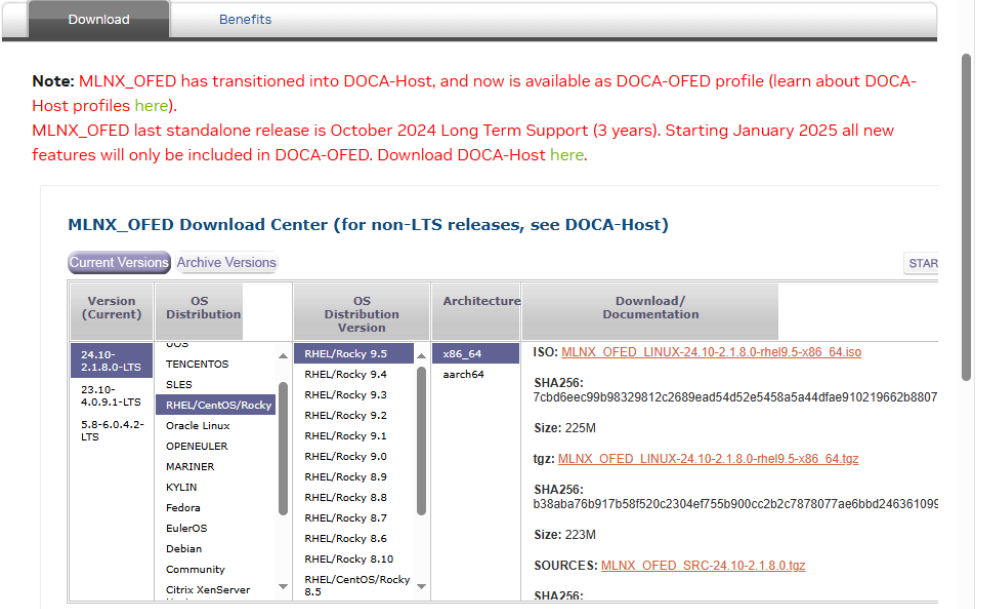
Look through the available downloads and see if you can find the currently available
LTS for Rocky 9.5 x86_64.
After that find a distribution of your choice and play with their tool.
LAB
This lab is designed to have the engineer practice deploying patches in a Linux environment. The engineer will create repos and then deploy patches through an automated enterprise level Ansible playbook. But first, the engineer will review some of the Apache 2.4 STIG requirements if they want to run their own repo on their network.
Apache STIGs Review
-
Look at the 4 STIGs for "tls"
- What file is fixed for all of them to be remediated?
-
Install httpd on your Hammer server
systemctl stop wwclient dnf install -y httpd systemctl start httpd -
Check STIG V-214234
-
What is the problem?
-
What is the fix?
-
What type of control is being implemented?
-
Is it set properly on your system?
-
-
Check STIG V-214248
-
What is the problem?
-
What is the fix?
-
What type of control is being implemented?
-
Is it set properly on your system?
-
How do you think SELINUX will help implement this control in an enforcing state? Or will it not affect it?
-
Building repos
-
Start out by removing all your active repos
cd /etc/yum.repos.d mkdir old_archive mv *.repo old_archive dnf repolist -
Mount the local repository and make a local repo
mount -o loop /lab_work/repos_and_patching/Rocky-9.5-x86_64-dvd.iso /mnt
df -h  # Should see the mount point
ls -l /mnt
touch /etc/yum.repos.d/rocky9.repo
vi /etc/yum.repos.d/rocky9.repo
Add the repo configuration:
[BaseOS]
name=BaseOS Packages Rocky Linux 9
metadata_expire=-1
gpgcheck=1
enabled=1
baseurl=file:///mnt/BaseOS/
gpgkey=file:///etc/pki/rpm-gpg/RPM-GPG-KEY-redhat-release

[AppStream]
name=AppStream Packages Rocky Linux 9
metadata_expire=-1
gpgcheck=1
enabled=1
baseurl=file:///mnt/AppStream/
gpgkey=file:///etc/pki/rpm-gpg/RPM-GPG-KEY-redhat-release
Save with
esc :wqor "shift + ZZ"- Do the paths you're using here make sense to you based off what you saw
when using the
ls -l? Why or why not?
chmod 644 /etc/yum.repos.d/rocky9.repo dnf clean all - Do the paths you're using here make sense to you based off what you saw
when using the
-
Test the local repository.
dnf repolist dnf --disablerepo="*" --enablerepo="AppStream" list available- Approximately how many are available?
dnf --disablerepo="*" --enablerepo="AppStream" list available | nl
dnf --disablerepo="*" --enablerepo="AppStream" list available | nl | head
Now use BaseOS.
dnf --disablerepo="*" --enablerepo="BaseOS" list available- Approximately how many are available?
dnf --disablerepo="*" --enablerepo="BaseOS" list available | nl dnf --disablerepo="*" --enablerepo="BaseOS" list available | nl | head-
Try to install something
dnf --disablerepo="*" --enablerepo="BaseOS AppStream" install gimp # hit "n"-
How many packages does it want to install?
-
How can you tell they're from different repos?
-
-
Share out the local repository for your internal systems (tested on just this one system)
rpm -qa | grep -i httpd
systemctl status httpd
ss -ntulp | grep 80
lsof -i :80
cd /etc/httpd/conf.d
vi repos.conf
Edit the file:
<Directory "/mnt">
    Options Indexes FollowSymLinks
    AllowOverride None
    Require all granted
</Directory>
Alias /repo /mnt
<Location /repo>
    Options Indexes FollowSymLinks
    AllowOverride None
    Require all granted
</Location>
Restart the service.
systemctl restart httpd
vi /etc/yum.repos.d/rocky9.repo
Edit the file with your lab's name in the
baseurl:###USE YOUR HAMMER MACHINE IN BASEURL### [BaseOS] name=BaseOS Packages Rocky Linux 9 metadata_expire=-1 gpgcheck=1 enabled=1 #baseurl=file:///mnt/BaseOS/ baseurl=http://hammer25/repo/BaseOS/ gpgkey=file:///etc/pki/rpm-gpg/RPM-GPG-KEY-redhat-release [AppStream] name=AppStream Packages Rocky Linux 9 metadata_expire=-1 gpgcheck=1 enabled=1 #baseurl=file:///mnt/AppStream/ baseurl=http://hammer25/repo/AppStream/ gpgkey=file:///etc/pki/rpm-gpg/RPM-GPG-KEY-redhat-release- Do the paths you've modified at
baseurlmake sense to you? If not, what do you need to better understand?
dnf clean all dnf repolist Try to install something dnf --disablerepo="*" --enablerepo="BaseOS AppStream" install gimp - Do the paths you've modified at
Enterprise patching
-
Complete the killercoda lab found here: https://killercoda.com/het-tanis/course/Ansible-Labs/102-Enterprise-Ansible-Patching
- Look at the roles, in the order the are run in the playbook.
- Does it make sense how the custom facts are used? What other custom facts might you use?
- What are the prechecks doing? What other ones might you add?
- What does the reboot task do, and how does it check for reboot to be needed?
- Look at the roles, in the order the are run in the playbook.
Digging Deeper challenge (not required for finishing lab)
-
You've set up a local repository and you've shared that repo out to other systems that might want to connect. Why might you need this if you're going to fully air-gap systems?
Is it still necessary even if your enterprise patching solution is well designed? Why or why not? -
Can you add the Mellanox ISO that is included in the
/lab_work/repos_and_patchingsection to be a repository that your systems can access? If you have trouble, troubleshoot and ask the group for help. -
Make a pull request to improve the enterprise patching tool that you just used. Write up, for the group, why you need that change and how it improves the efficacy of the patching.
Be sure to
rebootthe lab machine from the command line when you are done.
Overview
Monitoring and parsing logs is one of the most essential security engineering practices in any production environment.
This unit explores how logs are generated, formatted, collected, and analyzed across various layers of the infrastructure stack, from applications to operating systems to networks.
Students will gain an operational understanding of how to identify log sources, use modern tools for log aggregation and search (such as Loki), and develop awareness of log structure, integrity, and retention requirements.
Learning Objectives
By the end of Unit 6, students will:
- Understand the different types of logs and their role in system and security monitoring.
- Identify log structures (e.g., RFC 3164, RFC 5424,
journald) and apply appropriate parsing techniques. - Explore and configure log aggregation pipelines using modern tools like Grafana Loki.
- Analyze real-world security events using log data and query languages.
- Learn how log immutability and integrity contribute to reliable forensics and compliance.
Relevance & Context
Logs are often the first and best source of truth when diagnosing an incident,
auditing a system, or responding to a breach.
Without well-structured, searchable, and preserved logs, response teams are blind to
what actually happened.
This unit trains students to think like operators and defenders -- ensuring logs are complete, available, immutable, and actionable.
It builds directly on previous units around compliance and auditing, preparing learners to create scalable observability strategies that support both security and performance goals.
Prerequisites
Before beginning Unit 6, students should:
- Be comfortable working at the command line using
journalctl,grep,less, and related tools. - Understand system service management with
systemctl. - Have basic familiarity with syslog, log rotation, and the concept of standard input/output streams.
- Be able to interact with YAML and JSON-formatted configuration files.
- Have installed or downloaded STIG Viewer 2.18 for compliance reference.
Key terms and Definitions
Types of Logs
- Application Logs
- Host Logs
- Network Logs
- Database Logs
Log Structure
- RFC 3164 BSD Syslog
- RFC 5424 IETF Syslog
- Systemd Journal
Log Rotation
Log Aggregation
- ELK Stack
- Splunk
- Loki
- Graylog
SIEM (Security Information and Event Management)
Instructions
Fill out this sheet as you progress through the lab and discussions. Hold your worksheets until the end to turn them in as a final submission packet.
Resources / Important Links
- https://grafana.com/docs/loki/latest/query/analyzer/
- https://www.sans.org/information-security-policy/
- https://www.sans.org/blog/the-ultimate-list-of-sans-cheat-sheets/
- https://public.cyber.mil/stigs/downloads/
Downloads
The worksheet has been provided below. The document(s) can be transposed to
the desired format so long as the content is preserved. For example, the .txt
could be transposed to a .md file.
Unit 6 Recording
Discussion Post #1
Review chapter 15 of the SRE book: https://google.github.io/building-secure-and-reliable-systems/raw/ch15.html#collect_appropriate_and_useful_logs. There are 14 references at the end of the chapter. Follow them for more information. One of them: https://jvns.ca/blog/2019/06/23/a-few-debugging-resources/ should be reviewed for question "c".
- a. What are some concepts that are new to you?
- b. There are 5 conclusions drawn, do you agree with them? Would you add or remove anything from the list?
- c. In Julia Evan's debugging blog, which shows that debugging is just another form of troubleshooting, what useful things do you learn about the relationship between these topics? Are there any techniques you already do that this helps solidify for you?
Discussion Post #2
Read https://sre.google/sre-book/monitoring-distributed-systems/.
- What interesting or new things do you learn in this reading? What may you want to know more about?
- What are the "4 golden signals"?
- After reading these, why is immutability so important to logging? What do you think the other required items are for logging to be effective?
The discussion posts are done in Discord threads. Click the 'Threads' icon on the top right and search for the discussion post.
Definitions
Types of logs
- Application
- Host
- Network
- DB
Immutable
Structure of Logs
- RFC 3164 BSD Syslog
- RFC 5424 IETF Syslog
- Systemd Journal
Log rotation
Rsyslog
Log aggregation
- ELK
- Splunk
- Graylog
- Loki
SIEM
Digging Deeper
-
Find a cloud service and see what their logging best practices are for security incident response. Here is AWS: https://aws.amazon.com/blogs/security/logging-strategies-for-security-incident-response/
- What are the high level concepts mentioned?
- What are the tools available and what actions do they take?
- What are the manual and automated query capabilities provided, and how they help you rapidly get to a correct assessment of the logged events?
-
Open up that STIG Viewer and filter by "logging" for any of the previous STIGs we've worked on. (Mariadb has some really good ones.)
- What seems to be a common theme?
- What types of activities MUST be logged in various applications and operating systems?
- Does it make sense why all logins are tracked?
- Does it make sense why all admin actions, even just attempted admin actions, are logged?
Reflection Questions
-
What architectures have you used in your career?
- If you haven't yet worked with any of these, what do you think you would architect in the ProLUG lab (~60 virtual machines, 4 physical machines, 1 NFS share, and 2 Windows laptops?)
-
What questions do you still have about this week?
-
How are you going to use what you've learned in your current role?
If you are unable to finish the lab in the ProLUG lab environment we ask you
rebootthe machine from the command line so that other students will have the intended environment.
Required Materials
Putty or other connection tool Lab Server
Root or sudo command access
STIG Viewer 2.18 (download from https://public.cyber.mil/stigs/downloads/ )
Downloads
The lab has been provided below. The document(s) can be transposed to
the desired format so long as the content is preserved. For example, the .txt
could be transposed to a .md file.
Lab 🧪
In keeping with the lab for this week, there are 4 major architectures for collecting and storing logs. Within these architectures exist many mutations from the archetype that solve different problems addressed in the scale, reliability, real-time analysis, budget, expertise, compliance, and existing infrastructure of the systems being logged.
This lab will touch 3 of the 4 types of architectures, so that the learner understands the deployment and capabilities. The 4th, cloud, architecture type will be optionally completed by the learner for their cloud deployment of choice. The learner can then reflect on the tradeoff of why one or another of these tools may be the right choice in their organization or not.
Rsyslog forwarding and collection
- Consider this architecture, where all modern Linux systems have built in rsyslog capabilities. One of them can be set to "catch" or aggregate all logs and then any number of servers can send over to them.
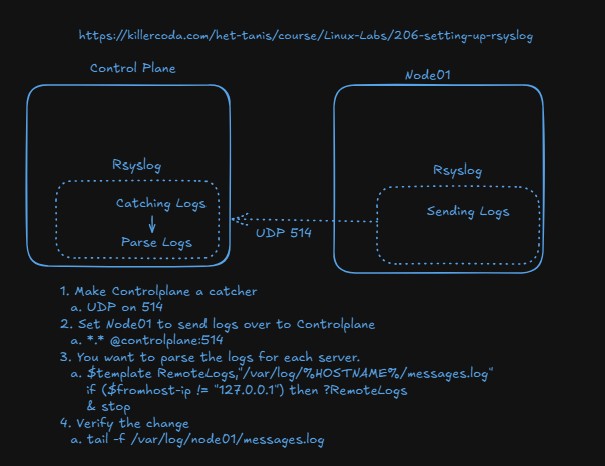
-
Complete the lab: https://killercoda.com/het-tanis/course/Linux-Labs/206-setting-up-rsyslog
-
Why do we split out the logs in this lab? Why don't we just aggregated them to one place?
- What do we split them out by?
- How does that template configuration work?
-
Are we securing this communication in any way, or do we still need to configure that?
-
-
We will revisit this lab in Unit 10, with security involved via certificates, so make sure you are comfortable with the base components you are configuring.
Agents forward to a centralized platform
-
Review the base architecture here: https://grafana.com/docs/loki/latest/get-started/architecture/
-
Complete the lab here: https://killercoda.com/het-tanis/course/Linux-Labs/102-monitoring-linux-logs
-
Does the lab work correctly, and do you understand the data flow?
-
While still in the lab
-
cd /answers -
python3 loki-write.py #Do this a few times -
Refresh your Grafana and change the app to lab_logging
-
Can you see it in your Grafana?
-
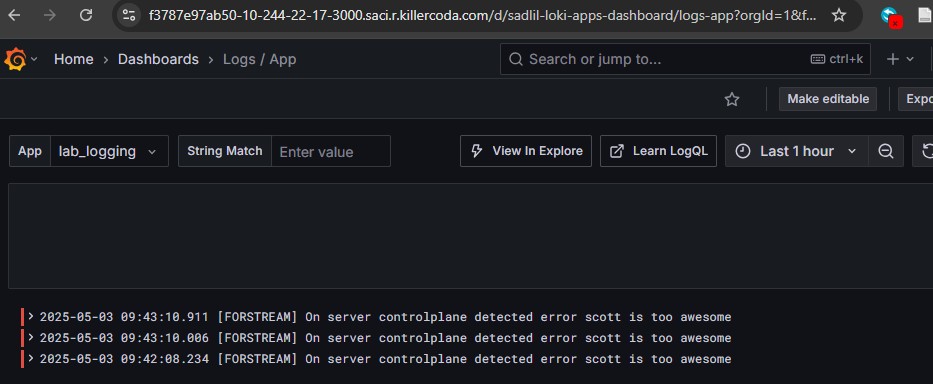
-
Can you modify the file loki-write.py to say something related to your name?
-
Run this bash snippet and see if you can see your loki-writes
curl -G -s "http://localhost:3100/loki/api/v1/query_range" \ --data-urlencode 'query=sum(rate({job="lab_logging"}[10m])) by (level)' \ --data-urlencode 'step=300' | jq- Can you modify that to see the actual entires? https://grafana.com/docs/loki/latest/reference/loki-http-api/#query-logs-within-a-range-of-time
-
-
We will revisit this lab in Unit 10, with security involved via certificates, so make sure you are comfortable with the base components you are configuring.
Message Queues (Event Bus) for log aggregation and propagation
-
Apache Kafka is not the only message queue, but it is extremely popular (found in 80% for Fortune 100 companies… or 80 of them). Read about the use cases here: https://kafka.apache.org/uses
-
Review our diagram here. Maybe we're testing kafka and want to integrate it to the existing infrastructure. Maybe we have a remote location that we need to reliably catch logs in real time and then move them remote. There are many reasons to use this.
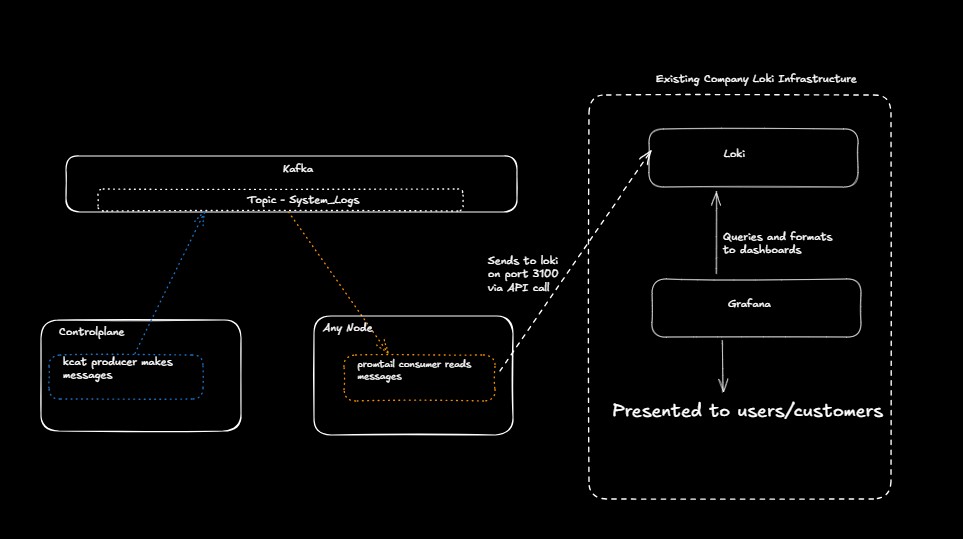
-
Complete the killercoda lab found here: https://killercoda.com/het-tanis/course/Linux-Labs/108-kafka-to-loki-logging
-
Did you get it all to work?
- Does the flow make sense in the context of this diagram?
-
Can you find any configurations or blogs that describe why you might want to use this architecture or how it has been used in the industry?
-
(OPTIONAL) Cloud-Native Logging services
-
OPTIONAL: Setup VPC flow logs in your AWS environment: https://catalog.workshops.aws/well-architected-security/en-US/3-detection/40-vpc-flow-logs-analysis-dashboard/1-enable-vpc-flow-logs
-
OPTIONAL: Even if not completing these labs, why might it be useful to understand the fields of a VPC flow log even if you're not setting up logging in AWS environments (but your organization does use AWS)? https://docs.aws.amazon.com/vpc/latest/userguide/flow-logs-records-examples.html
Digging Deeper challenge (not required for finishing lab)
-
For Architecture 3, using message queues. This is an excellent write-up of how disparate systems can be connected with a message queues or event bus to enhance metrics pipelining. https://get.influxdata.com/rs/972-GDU-533/images/Customer%20Case%20Study_%20Wayfair.pdf
- They're not necessarily doing logs, but rather metric data, but can you see how they solved their latency and connectivity problems on page 14 and 15?
-
Review some of the anti-patterns for cloud, but really any logging patterns. https://docs.aws.amazon.com/wellarchitected/latest/framework/sec_detect_investigate_events_app_service_logging.html
-
How do these relate to your current understanding of logging?
-
Do they show anything that you need to think about in the future of how you look at enterprise logging?
-
-
Go to https://landscape.cncf.io/guide#observability-and-analysis--observability
-
Which of these have you used and which have you not used?
-
How do many of these plug into existing observability patterns (logging)?
-
What is Fluentd trying to solve? How does it work? https://www.fluentd.org/architecture
-
Be sure to
rebootthe lab machine from the command line when you are done.
Overview
Monitoring systems and alerting when issues arise are critical responsibilities for system operators. Effective observability ensures that system health, performance, and security can be continuously assessed. In this unit, we will explore how to design reliable monitoring infrastructures through sound architectural decisions. We will also examine how alerts can be tuned and moderated to minimize noise, prioritize actionable events, and ensure timely response to real issues.
Learning Objectives
- Understand robust monitoring architecture.
- Understand what comprises a well architected monitoring pipeline.
- Understand alert fatigue and how to focus on pertinent, actionable alerts.
- Understand the trade off between information flow and security.
- Get hands on with Fail2Ban, Prometheus, and Grafana.
Relevance & Context
As environments scale and threats evolve, visibility into system activity becomes vital to security assurance. Monitoring and alerting form the backbone of incident detection and response, making them essential tools for any security engineer aiming to maintain resilience without hindering operational flow.
Prerequisites
To be successful, students should have a working understanding of skills and tools including:
- Basic directory navigation skills.
- Ability to edit and manage configuration files.
- Understanding of SystemD services and the use of the
sysctlcommand. - Basic knowledge of Bash scripting.
Key terms and Definitions
Tracing
Span
Label
Time Series Database (TSDB)
Queue
Upper control limit / Lower control limit (UCL/LCL)
Aggregation
SLO, SLA, SLI
Push v. Pull of data
Alerting rules
Alertmanager
Alert template
Routing
Throttling
Monitoring for defensive operations
SIEM
Intrusion Detection Systems - IDS
Intrusion Prevention Systems - IPS
Instructions
Fill out this sheet as you progress through the lab and discussions. Hold your worksheets until the end to turn them in as a final submission packet.
Resources / Important Links
- https://promlabs.com/promql-cheat-sheet/
- https://www.sans.org/information-security-policy/
- https://www.sans.org/blog/the-ultimate-list-of-sans-cheat-sheets/
Downloads
The worksheet has been provided below. The document(s) can be transposed to
the desired format so long as the content is preserved. For example, the .txt
could be transposed to a .md file.
Unit 7 Recording
Discussion Post #1
Read about telemetry, logs, and traces. Ther are many good sources, even from Microsoft: https://microsoft.github.io/code-with-engineering-playbook/observability/log-vs-metric-vs-trace/
-
How does the usage guidance of that blog (at bottom) align with your understanding of these three items?
-
What other useful blogs or AI write-ups were you able to find?
-
What is the usefulness of this in securing your system?
Discussion Post #2
When we think of our systems, sometimes an airgapped system is simple to think about because everything is closed in. The idea of alerting or reporting is the opposite. We are trying to get the correct, timely, and important information out of the system when and where it is needed.
Read the summary at the top of: https://docs.google.com/document/d/199PqyG3UsyXlwieHaqbGiWVa8eMWi8zzAn0YfcApr8Q/edit?tab=t.0
-
What is the litmus test for a page? (Sending something out of the system?)
-
What is over-monitoring v. under-monitoring? Do you agree with the assessment of the paper? Why or why not, in your experience?
-
What is cause-based v. symptom-based and where do they belong? Do you agree?
Submit your input by following the link below.
The discussion posts are done in Discord Forums.
Definitions
Telemetry
Tracing
- Span
- Label
Time Series Database (TSDB)
Queue
Upper control limit / Lower control limit (UCL/LCL)
Aggregation
SLO, SLA, SLI
Push v. Pull of data
Alerting rules
Alertmanager
- Alert template
- Routing
- Throttling
Monitoring for defensive operations
- SIEM
- Intrusion Detection Systems - IDS
- Intrusion Prevention Systems - IPS
Digging Deeper
-
Look into Wazuh: Security Information and Event Management (SIEM). Real Time Monitoring | Wazuh
- What are their major capabilities and features (what they advertise)?
- What are they doing with logs that increases visibility and usefulness in the security space? Log data analysis - Use cases · Wazuh documentation
Reflection Questions
-
What do I mean when I say that security is an art and not an engineering practice?
-
What questions do you still have about this week?
-
How are you going to use what you've learned in your current role?
If you are unable to finish the lab in the ProLUG lab environment we ask you
rebootthe machine from the command line so that other students will have the intended environment.
Required Materials
Putty or other connection tool Lab Server
Root or sudo command access
STIG Viewer 2.18 (download from https://public.cyber.mil/stigs/downloads/ )
Downloads
The lab has been provided below. The document(s) can be transposed to
the desired format so long as the content is preserved. For example, the .txt
could be transposed to a .md file.
Lab 🧪
These labs focus on pulling metric information and then visualizing that data quickly on dashboards for real time analysis.
Monitoring Jails with Fail2ban logs
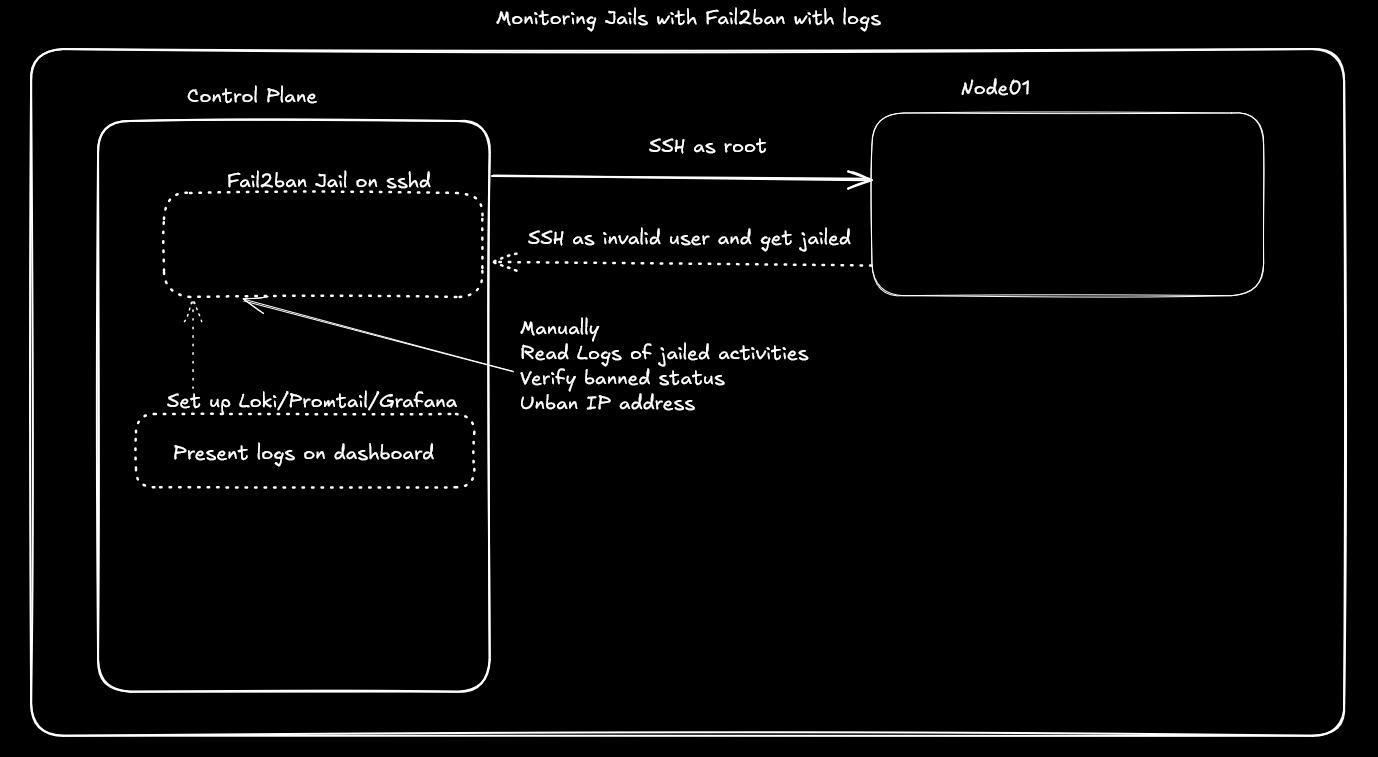
-
Complete the lab: https://killercoda.com/het-tanis/course/Linux-Labs/109-fail2ban-with-log-monitoring
-
Were you able to see the IP address that was banned and unban it?
-
Were you able to see all the NOTICE events in Grafana?
-
What other questions do you have about this lab, and how might you go figure them out?
-
Monitoring Jails with Fail2ban and telemetry data
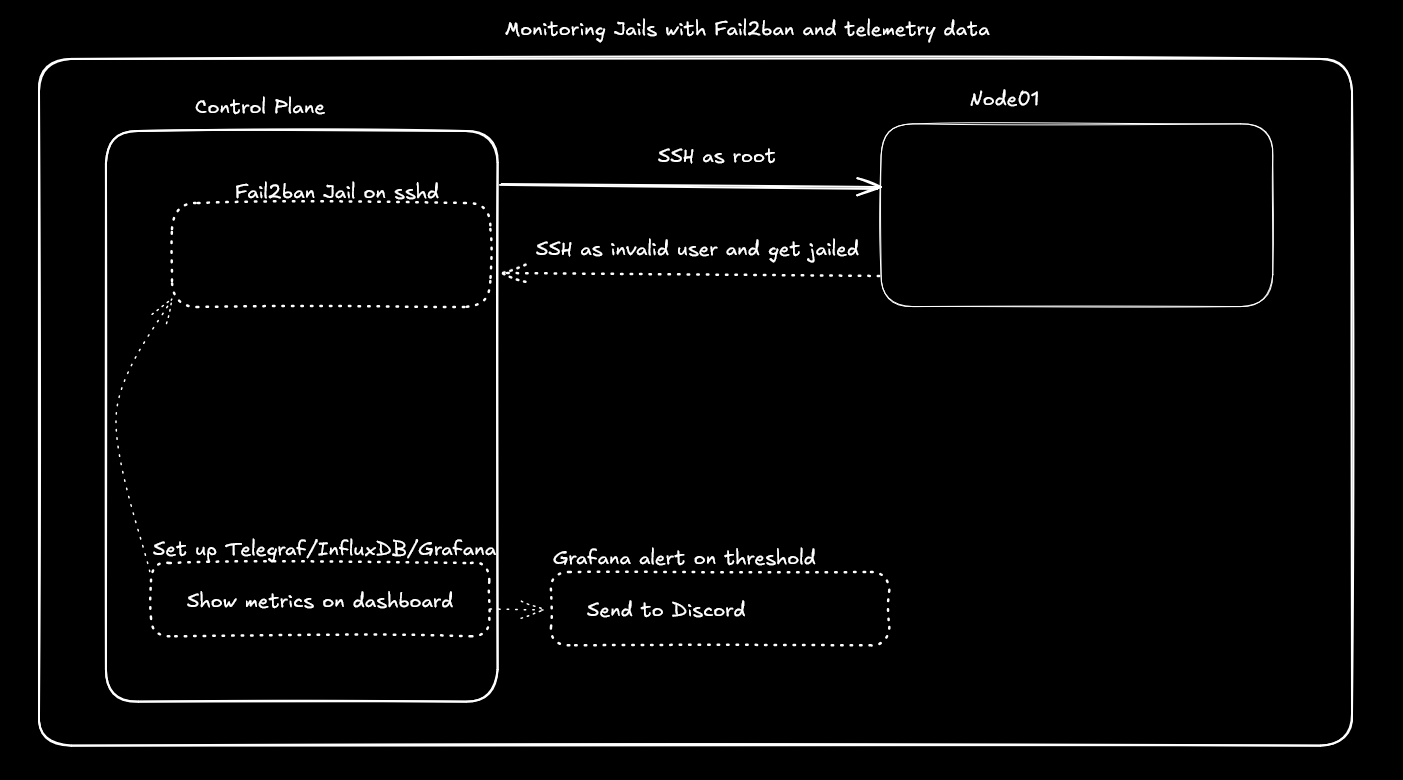
-
Complete the lab here: https://killercoda.com/het-tanis/course/Linux-Labs/110-fail2ban-with-metric-alerting
-
Do you see
fail2banin the Grafana Dashboard? If not, how are you going to troubleshoot it? -
Did you get your test alert and then real alert to trigger into the Discord channel?
-
What other applications or uses for this could you think of? Do you have other places you could send alerts that would help you professionally?
-
Digging Deeper challenge (not required for finishing lab)
-
Review the alert manager documentation: https://prometheus.io/docs/alerting/latest/configuration/
-
What are all the types of receivers you see?
-
Which of the receivers do you have experience with?
-
-
Review the Grafana alert thresholds: https://grafana.com/docs/grafana/latest/panels-visualizations/configure-thresholds/
-
Can you modify one of the thresholds from the lab to trigger into the discord?
-
What is the relationship between critical and warning by default?
-
Be sure to
rebootthe lab machine from the command line when you are done.
Overview
Configuration drift is the silent enemy of consistent, secure infrastructure.
When systems slowly deviate from their intended state, whether that be through manual
changes, failed updates, or misconfigured automation, security risks increase and
reliability suffers.
In this unit, we focus on identifying, preventing, and correcting configuration drift.
Students will explore concepts like Infrastructure as Code (IaC), immutable
infrastructure, and centralized configuration management.
We will also look at how drift can be detected through tools like AIDE and remediated
through automation platforms like Ansible.
Students will not only understand why drift happens, but also learn how to build resilient systems that can identify and self-correct unauthorized changes.
Learning Objectives
- Define configuration drift and understand its impact on security and operations.
- Explore change management frameworks, including CMDBs and baselines.
- Implement detection tools like AIDE to monitor file system integrity.
- Use Ansible to remediate drift and enforce configuration state.
- Connect drift management to compliance, auditability, and incident response.
Relevance & Context
Configuration drift undermines both security and operational goals.
Whether through silent config changes or forgotten test artifacts, drift introduces
uncertainty and risk.
In enterprise environments, undocumented changes can void audits, invalidate incident
investigations, or introduce vulnerabilities unnoticed.
Security engineers must treat configuration as code and enforce strong change control policies. By learning to detect, document, and automatically remediate drift, students will be equipped to reduce their organization's attack surface and ensure long-term consistency.
This unit ties together principles of monitoring, logging, and automation into a unified practice: configuration control.
Prerequisites
To succeed in this unit, students should be comfortable with:
- Basic command line navigation and editing skills (
vi,cat,grep) - Experience using Ansible or YAML-based automation (basic playbook structure)
- Familiarity with STIGs and the use of the STIG Viewer
Key terms and Definitions
Configuration Drift
System Lifecycle
Change Management
- CMDB (Configuration Management Database)
- CI (Configuration Item)
- Baseline
Build Book / Run Book
Immutable Infrastructure
Hashing
md5sum,sha256sum, etc.
IaC (Infrastructure as Code)
Orchestration
Automation
AIDE (Advanced Intrusion Detection Environment)
Instructions
Fill out this sheet as you progress through the lab and discussions. Hold your worksheets until the end to turn them in as a final submission packet.
Resources / Important Links
- https://google.github.io/building-secure-and-reliable-systems/raw/ch14.html#treat_configuration_as_code
- https://en.wikipedia.org/wiki/Configuration_management
- https://www.sans.org/information-security-policy/
- https://www.sans.org/blog/the-ultimate-list-of-sans-cheat-sheets/
Downloads
The worksheet has been provided below. The document(s) can be transposed to
the desired format so long as the content is preserved. For example, the .txt
could be transposed to a .md file.
Unit 8 Recording
Discussion Post #1
Read about configuration management here: https://en.wikipedia.org/wiki/Configuration_management
-
What overlap of terms and concepts do you see from this week’s meeting?
-
What are some of the standards and guidelines organizations involved with configuration management?
- Do you recognize them from other IT activities?
Discussion Post #2
Review the SRE guide to treating configurations as code.
Read as much as you like, but focus down on the “Practical Advice” section:
https://google.github.io/building-secure-and-reliable-systems/raw/ch14.html#treat_configuration_as_code
-
What are the best practices that you can use in your configuration management adherence?
-
What are the security threats and how can you mitigate them?
-
Why might it be good to know this as you design a CMDB or CI/CD pipeline?
Submit your input by following the link below.
The discussion posts are done in Discord Forums.
Definitions
System Lifecycle
Configuration Drift
Change management activities
- CMDB
- CI
- Baseline
Build book
Run book
Hashing
md5sumsha<x>sum
IaC
Orchestration
Automation
AIDE
Digging Deeper
- Review more of the SRE books from Google: https://sre.google/books/ to try to find more useful change management practices and policies.
Reflection Questions
-
How does the idea of control play into configuration management? Why is it so important?
-
What questions do you still have about this week?
-
How are you going to use what you’ve learned in your current role?
If you are unable to finish the lab in the ProLUG lab environment we ask you
rebootthe machine from the command line so that other students will have the intended environment.
Required Materials
Putty or other connection tool Lab Server
Root or sudo command access
STIG Viewer 2.18 (download from https://public.cyber.mil/stigs/downloads/ )
Downloads
The lab has been provided below. The document(s) can be transposed to
the desired format so long as the content is preserved. For example, the .txt
could be transposed to a .md file.
Lab 🧪
These labs focus on configuration drift tracking and remediation.
Operational Activities
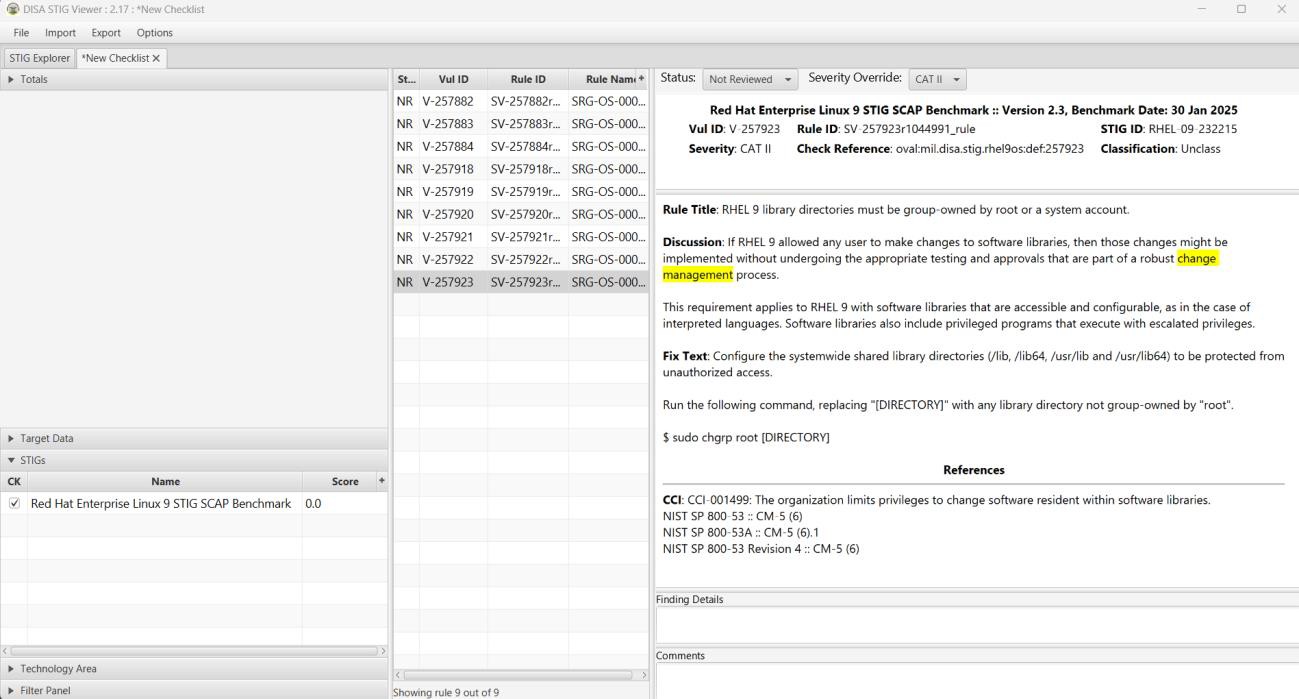
-
Check your stig viewer and go to RHEL 9 stigs.
-
Set a filter for “change management”.
- How many STIGs do you see?
-
Review the wording, what is meant by a robust change management process?
- Do you think this can be applied in just one STIG? Why or why not?
- What type of control is being implemented with change management in these STIGS?
- Is it different across the STIGs or all the same?
Monitoring configuration drift with Aide
-
Go into the sandbox lab: https://killercoda.com/playgrounds/scenario/ubuntu
-
Install aide and watch the installation happen.
apt -y install aide- What is being put in the path
/etc/aide/aide.conf.d/?- How many files are in there?
- What is being put in the path
-
Check your version of aide
aide -v -
Read the man page (first page).
man aide- What does aide try to do, and how does it do it?
-
What is the configuration of cron found in
/etc/cron.daily/dailyaidecheck?- What does this attempt to do?
- What checks are there before execution?
- Read the man for
capsh, what is it used for?
-
Set up aide according to the default configuration
time aide -i -c /etc/aide/aide.conf- How long did that take?
- How much time was wall clock v. system/user time?
- Why might you want to know this on your systems?
- What do you notice about the output?
- What do you need to go read about?
- How long did that take?
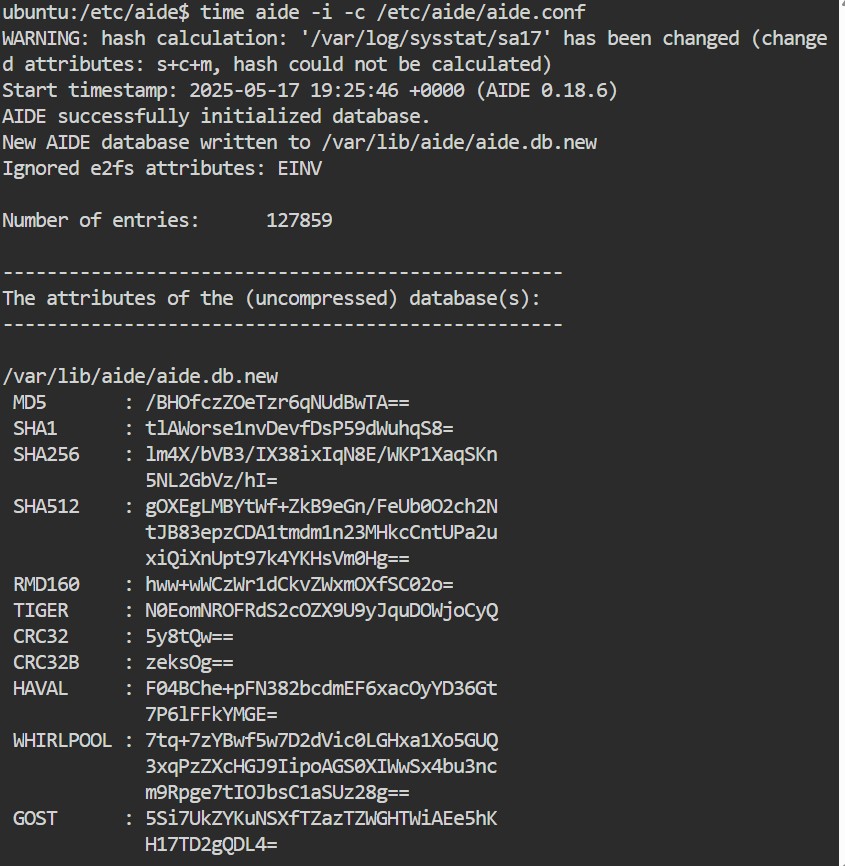
(Mine took 5 minutes 8 seconds to run on the lab system)
-
Set the database up properly
cp /var/lib/aide/aide.db.new /var/lib/aide/aide.db -
Test aide by making files in a tracked directory
mkdir /root/prolug touch /root/prolug/test1 touch /root/prolug/test2 time aide -c /etc/aide/aide.conf --check- Did you see your new files created?
- How long did this take to run?
- What type of usage do you see against user/system space?

Using Ansible to fix drift
-
Complete the lab here: https://killercoda.com/het-tanis/course/Ansible-Labs/16-Ansible-Web-Server-Env-Deploy
-
When you finish ensure that you see broken output for 8081, as required.
curl node01:8081 -
One of the dev teams figured out they could modify the
testandqaenvironments because a previous engineer left them in the sudoers file. You can address that separately with the security team, but for now you need to get those environments back to working. Run your original deployment command to see if it sets mhe environment back properly.ansible-playbook -i /root/hosts /root/web_environment.yaml
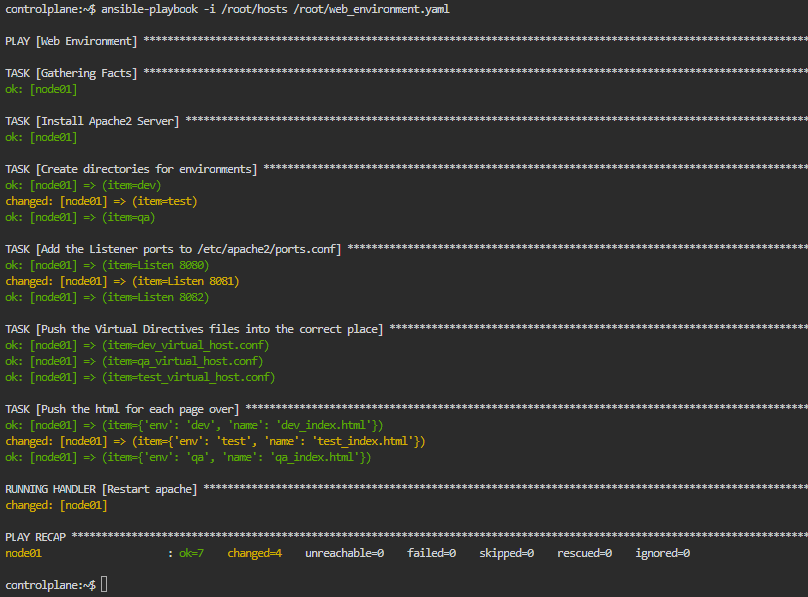
- Did this force the system back into a working configuration?
- If it worked, would it always work, or would they (the systems) need to be manually intervened?
- What is your test? (hint:
curlthe ports8080,8081, and8082from previous commands)
- Could this cause potential problems in the environment?
- If so, is that problem based on technology or operational practices? Why?
Digging Deeper challenge (not required for finishing lab)
- Complete this lab: https://killercoda.com/het-tanis/course/Ansible-Labs/19-Ansible-csv-report
- Can you think about how you’d use this to verify that a system was stamped
according to your build process?
- You may have to tie it in with something like this lab and add some variables to your custom facts files, maybe the date of deployment: https://killercoda.com/het-tanis/course/Ansible-Labs/12-Ansible-System-Facts-Grouping
- Can you think about how you’d use this to verify that a system was stamped
according to your build process?
Be sure to
rebootthe lab machine from the command line when you are done.
Overview
In today’s interconnected world, the integrity and security of transmitted data are paramount. As systems grow in complexity and interdependence, it’s crucial to verify the identity of those we communicate with and to protect the data in transit. Certificates and keys form the backbone of this trust. By securely exchanging and validating cryptographic keys and digital certificates, we establish a system where data can be encrypted, identities can be authenticated, and communications can be trusted.
Learning Objectives
- Define the purpose and function of digital certificates and cryptographic keys.
- Understand the differences between symmetric and asymmetric encryption.
- Learn how TLS uses certificates for secure communication.
- Explore the process of certificate signing and validation (PKI).
- Use tools like
opensslto generate keys and inspect certificates.
Prerequisites
- Basic command line navigation and editing skills (
vi,cat,grep) - Experience with editing config files using Vim
- Familiarity with key generation (Learned in prior chapters)
Relevance & Context
Certificates and Keys ensure trust and authenticity in both human and machine interactions. Whether securing APIs, internal services, or user sessions over HTTPS, public key infrastructure (PKI) allows systems to validate each other’s identities and encrypt traffic accordingly. These concepts are foundational in implementing secure DevOps pipelines, enforcing compliance standards like HIPAA or PCI-DSS, and ensuring resilience in infrastructure. Understanding how keys are generated, used, and validated is a critical skill for system administrators, security engineers, and DevOps professionals alike.
Key Terms & Definitions
- TLS
- Symmetric Keys
- Asymmetric Keys
- Non-Repudiation
- Anti-Replay
- Plaintext
- Cypher-Text
- Fingerprints
- Passphrase (in key generation)
Instructions
Fill out this sheet as you progress through the lab and discussions. Hold your worksheets until the end to turn them in as a final submission packet.
Resources / Important Links
- https://nvlpubs.nist.gov/nistpubs/SpecialPublications/NIST.SP.800-57pt1r5.pdf/
- https://nvlpubs.nist.gov/nistpubs/SpecialPublications/NIST.SP.800-52r2.pdf/
- https://www.sans.org/information-security-policy/
- https://www.sans.org/blog/the-ultimate-list-of-sans-cheat-sheets/
- https://nvlpubs.nist.gov/nistpubs/SpecialPublications/NIST.SP.800-57pt1r5.pdf
- https://nvlpubs.nist.gov/nistpubs/SpecialPublications/NIST.SP.800-52r2.pdf
Downloads
The worksheet has been provided below. The document(s) can be transposed to
the desired format so long as the content is preserved. For example, the .txt
could be transposed to a .md file.
Unit 9 Recording
- Coming Soon
Discussion Post #1
Read the Security Services section, pages 22-23 of https://nvlpubs.nist.gov/nistpubs/SpecialPublications/NIST.SP.800-57pt1r5.pdf and answer the following questions.
-
How do these topics align with what you already know about system security?
-
Were any of the terms or concepts new to you?
Submit your input by following the link below.
The discussion posts are done in Discord Forums.
Discussion Post #2
Review the TLS Overview section, pages 4-7 of https://nvlpubs.nist.gov/nistpubs/SpecialPublications/NIST.SP.800-52r2.pdf and answer the following questions.
-
What are the three subprotocols of TLS?
-
How does TLS apply
- Confidentiality
- Integrity
- Authentication
- Anti-replay
Submit your input by following the link below.
The discussion posts are done in Discord Forums.
Definitions
- TLS
- Symmetric Keys
- Asymmetric Keys
- Non-Repudiation
- Anti-Replay
- Plaintext
- Cyphertext
- Fingerprints
- Passphrase (in key generation)
Digging Deeper
- Finish reading about TLS in the publication and think about where you might apply it.
Reflection Questions
-
What were newer topics to you, or alternatively what was a new application of something you already had heard about?
-
What questions do you still have about this week?
-
How are you going to use what you've learned in your current role?
Lab 🧪
These labs focus on pulling metric information and then visualizing that data quickly on dashboards for real time analysis.
Downloads
The lab has been provided below. The document(s) can be transposed to
the desired format so long as the content is preserved. For example, the .txt
could be transposed to a .md file.
Setting up Rsyslog with TLS
- Complete the lab: https://killercoda.com/het-tanis/course/Linux-Labs/211-setting-up-rsyslog-with-tls
Review Solving the Bottom Turtle
- Review pages 41-48 of https://spiffe.io/pdf/Solving-the-bottom-turtle-SPIFFE-SPIRE-Book.pdf
- Does the diagram on page 44 make sense to you for what you did with a certificate authority in this lab?
SSH – Public and Private key pairs
- Complete the lab: https://killercoda.com/het-tanis/course/Linux-Labs/212-public-private-keys-with-ssh
- What is the significance of the permission settings that you saw on the generated public and private key pairs?
Digging Deeper challenge (not required for finishing lab)
-
Complete the following labs and see if they reinforce any of your understanding of certificates with the use of Kubernetes.
-
Read the rest of https://spiffe.io/pdf/Solving-the-bottom-turtle-SPIFFE-SPIRE-Book.pdf
- How does that align with your understanding of zero-trust? if you haven't read about zero-trust, start here:
- https://nvlpubs.nist.gov/nistpubs/SpecialPublications/NIST.SP.800-207.pdf
Overview
This final unit serves as a reflection point for the course, providing students the opportunity to step back, assess what they've learned, and think deeply about how these skills apply to real-world systems and career goals.
Unit 10 is less about introducing new tools or frameworks and more about consolidating your knowledge into a cohesive security engineering mindset. Whether through discussion posts, project finalization, or self-assessment, this unit is designed to help you articulate your growth and prepare to present yourself as a capable security professional.
Learning Objectives
- Reflect on key topics covered throughout the course and identify strengths and weaknesses.
- Practice articulating technical security concepts and processes in your own words.
- Prepare for technical interviews or resume reviews through self-explanation of security workflows.
- Finalize and polish your capstone project deliverables.
- Connect course topics to real industry expectations in security engineering.
Relevance & Context
Cybersecurity isn't about memorizing tools -- it's about learning how to
think like both a defender and an attacker.
By this point in the course, you’ve explored threat modeling, auditing, configuration management, logging, and more. This unit challenges you to connect the dots.
Real-world roles demand not just technical skills, but also the ability to communicate your reasoning, defend your design decisions, and think critically under pressure.
Reflection helps you distill your experience into something actionable and transferable -- whether you're applying for jobs, building infrastructure, or consulting on hardening strategies. It can also help you determine where your weak points are and what you need to spend more time on learning.
Prerequisites
To make the most of this unit, students should:
- Have completed or attempted all prior labs and worksheets.
- Be comfortable referencing course topics such as logging, STIGs, monitoring, automation, and baselining.
- Be prepared to synthesize and summarize technical content in their own words.
- Have begun (or be close to completing) their final project documentation and diagrams.
Key terms and Definitions
This unit's terms and definitions are to be drawn from the lesson or recording.
As you watch the recording, take note of terms you're not familiar with and take the time to research them.
Instructions
Fill out this sheet as you progress through the lab and discussions. Hold your worksheets until the end to turn them in as a final submission packet.
Resources / Important Links
Downloads
The worksheet has been provided below. The document(s) can be transposed to
the desired format so long as the content is preserved. For example, the .txt
could be transposed to a .md file.
Unit 10 Recording
Discussion Post #1
Capture all the terms and concepts that we talk about in this week’s recording.
- How many new topics or concepts do you have to go read about now?
- What was completely new to you?
- What is something you heard before, but need to spend more time with?
Discussion Post #2
- Think about how the course objectives apply to the things you’ve worked on.
- How would you answer if I asked you for a quick rundown of how you would secure a Linux system?
- How would you answer if I asked you why you are a good fit as a security engineer in my company?
- Think about what security concepts you think bear the most weight as you
put these course objectives onto your resume.
- Which would you include?
- Which don’t you feel comfortable including?
Submit your input by following the link below.
The discussion posts are done in Discord Forums.
Definitions
- Capture terms and definitions from this week's lesson or recording
Digging Deeper
- Review more of the SRE books from Google: https://sre.google/books/ to try to find more useful change management practices and policies.
If you are unable to finish the lab in the ProLUG lab environment we ask you
rebootthe machine from the command line so that other students will have the intended environment.
Required Materials
Putty or other connection tool Lab Server
Root or sudo command access
STIG Viewer 2.18 (download from https://public.cyber.mil/stigs/downloads/ )
Downloads
The lab has been provided below. The document(s) can be transposed to
the desired format so long as the content is preserved. For example, the .txt
could be transposed to a .md file.
Be sure to
rebootthe lab machine from the command line when you are done.
This book was made possible by a small group of dedicated contributors who worked diligently to create an accessible resource for future students enrolled in courses offered by the Professional Linux User Group.
The group met weekly to organize efforts, manage contributions, and onboard new volunteers. Using Git for version control and GitHub for project management, they converted existing courseware into Markdown and HTML. The content was then compiled with mdBook into a fast, searchable, multimedia learning resource.
Lead Authors
- Scott Champine
GitHub – Lead Author, network & security engineer, CISSP, Linux instructor.
Organizing Contributors:
- Chris McKee
- Connor Wilkins
- Trevor Smale
- Shane Dugas
Writing Contributors:
- Chris McKee
- Connor Wilkins
- Trevor Smale
- Shane Dugas
- Enzo Barcellos
The Professional Linux Users Group (ProLUG) provides a set of requirements and guidelines to contribute to this project. Below are steps to ensure contributors are adhering to those guidelines and fostering a productive version control environment.
Table of Contents
- How to be a Successful Contributor
- Signing your Git Commits with SSH
- Syncing your Fork with the Upstream ProLUG Repo
- Basic Contribution Workflow
- Supporting Material
How to be a Successful Contributor
To be an effective contributor understanding Git, whether through the command line or an external tool, will be an important part of contributing. To this effect it is important that any individual who contributes to this project have a working understanding of committing, merging, and other fundamental Git workflows.
For clarity this project utilizes GitHub for remote repositories and CI/CD testing pipeline workflows. Git and GitHub are two separate entities where GitHub provides the hosting services and Git provides the version control.
Prospective contributors are directed to several resources should they feel their competency with Git or GitHub falls short:
Git documentation:
Git and GitHub video tutorials:
- ByteByteGo's Git Explained in 4 Minutes (4m)
- Fireship's How to use Git and Github (12m)
- freeCodeCamp's Git and GitHub Crash Course (1hr)
Signing your Git Commits with SSH
Contributors who elect to contribute through the command line will need to verify their identities before their commits can be accepted. This step is not required if contributors will be submitting changes via GitHub.com itself since users will have verified their identities with GitHub's own verification process.
To reiterate, individuals contributing via command line will need to sign their commits through SSH. Signing GitHub commits helps ProLUG validate incoming commits from trusted contributors that reside outside the GitHub ecosystem. It can be quite trivial to impersonate users on GitHub and it is in the best interest of the project and contributors to observe this security practice.
It should also be noted that GitHub supplies tools like GitHub CLI
that abstract away the process of signing and verifying commits from the command line.
GitHub provides a gh auth login function to facilitate the procedure which contributors
can employ without the necessary changes suggested below.
To Sign your Git Commits with SSH:
Generate an SSH key pair if you don't have one:
ssh-keygen -t ed25519
Add SSH public key ('.pub' suffix) to GitHub as "Signing Key".
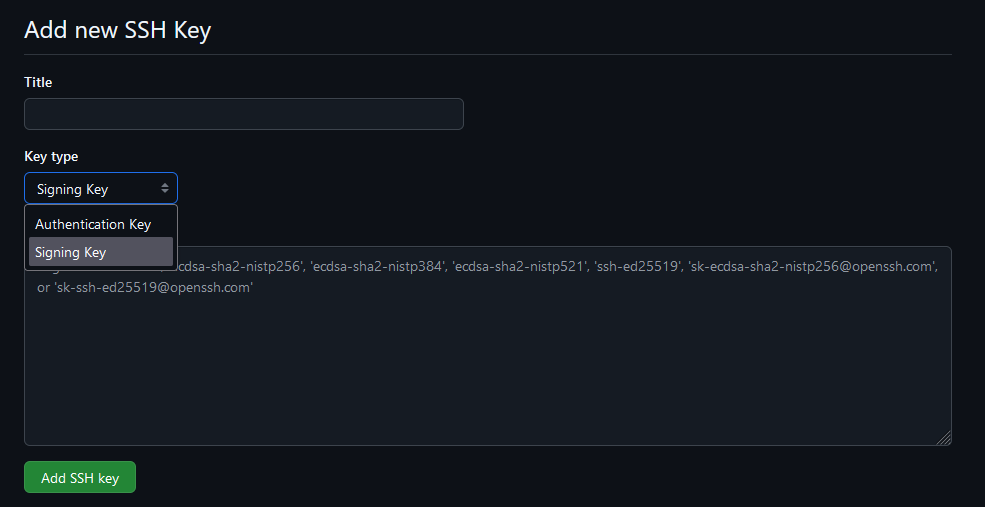
* GitHub.com -> Profile -> Settings -> GPG and SSH Keys -> Add SSH Key -> Drop down -> Signing Key
Below is a bash script that will attempt to configure signing Git commits on a localhost:
#!/bin/bash
GH_USERNAME="YourUsername"
git config --global gpg.format ssh
git config --global user.signingkey ~/.ssh/id_ed25519.pub
git config --global tag.gpgSign true
git config --global commit.gpgSign true
mkdir -p ~/.config/git
touch ~/.config/git/allowed_signers
echo "${GH_USERNAME} $(cat ~/.ssh/id_ed25519.pub)" > ~/.config/git/allowed_signers
git config --global gpg.ssh.allowedSignersFile ~/.config/git/allowed_signers
# Make a commit to verify
git log --show-signature -1
Make a commit after running those commands and then use git log --show-signature -1.
You should see something like Good "git" signature for <yourname> with ED25519 key SHA256:abcdef... if it worked.

Your commits should now be verified from your account. This helps us ensure that valid users are contributing to this project. Unverified commits will be scrutinized and likely discarded.
Syncing your Fork with the Upstream ProLUG Repo

In an effort to minimize merge conflicts we strongly suggest forks remain up to date with the original repository before committing changes. This will help us reduce pull request management overhead.
You can do this from the GitHub web UI easily with the Sync Fork button. If you want to do this from the terminal, you can add a new git remote called upstream.
git remote add upstream https://github.com/ProfessionalLinuxUsersGroup/psc.git
Then, to sync your local fork with the original repo, do a git pull from the upstream remote.
git pull upstream main
This fork should now be up to date with the original upstream repository.
Basic Contribution Workflow
You'll create your own fork of the repository using the GitHub web UI, create a branch, make changes, push to your fork, then open a pull request.
Comment First
If you'd like to work on a specific worksheet or lab, please let us know first by commenting on the issue so you can be assigned to it. This way, other contributors can see that someone is already working on it.
This helps the repository maintainers and contributors attain a high degree of visibility and collaboration before merging changes.
Create a Fork
Go to the original repository link. Click on "Fork" on the top right. Now you'll have your own version of the repository that you can clone.
git clone git@github.com:YOUR_USERNAME/psc.git
# Or, with https:
git clone https://github.com/YOUR_USERNAME/psc.git
Clone the Fork to your Local Machine
Then you'll need to clone your fork down to your local machine in order to work on it.
git clone git@github.com:yourname/psc.git
Create a New Branch
Whenever making changes contributors are highly encouraged to create a branch with an appropriate name. Switch to that branch, then make changes there.
For example, if you're working on the Unit 1 Worksheet:
git branch unit1-worksheet
git switch unit1-worksheet
# Or, simply:
git switch -c unit1-worksheet
Make changes to the u1ws.md.
Consider a few Useful Practices
The practices presented below are not required to contribute to the ProLUG course books but can streamline contributing to any project and are considered to some as best practice or incredibly useful when engaging in version control with Git.
Git Rebasing
Proper implementation of rebasing can leave a clean, and easily readable commit history for all concerned parties. Rebasing can also facilitate the management of branches and working directories in a notably active project.
The Git documentation provides a succinct explanation of its utility but also how it could potentially ruin a project and erase the work of other contributors.
Rebasing also plays a role in facilitating any commit reverts that may need to be made in the future. More on that will follow.
Git Rebasing documentation: https://git-scm.com/book/en/v2/Git-Branching-Rebasing
Commit Early, Often, and Squashing Commits
It is great practice to commit early, and often. This however can produce hard to read commits for repo maintainers and contributors. Squashing commits, which is a type of rebasing, can be utilized to compress a large number of commits made in a local repository before being pushed into a remote repository and eventual pull requests.
Below is an example of 4 local commits squashed into a single commit that was pushed remotely:
Squashing commits can improve readability, but its primary utility, especially for larger projects, may be in addressing an event where rolling back several commits due to a bug or test can be done with a single commit revert.
freeCodeCamp has a great write-up on this procedure. When done appropriately this can greatly facilitate the development process. Contributors are strongly encouraged to begin exploring these types of workflows if they never have.
Git Stashing
Another useful practice is to employ "stashing" uncommitted files in a local repository. This is useful in many contexts including stashing local changes to resolve recently introduced remote vs. local repo conflicts, or quickly switching working spaces.
Stashing effectively unstages any changes made in the local repo and saves them to be applied later. This can further help facilitate a rebase or merge before committing changes upstream for instance.
https://www.atlassian.com/git/tutorials/saving-changes/git-stash
https://git-scm.com/book/en/v2/Git-Tools-Stashing-and-Cleaning
Commit and Push your Changes
First make sure your forked repo is up-to-date with the original. Create your commit (make sure it's signed!), then push changes to your own fork on the new branch.
git commit -m "descriptive commit message"
git push origin unit1-worksheet
Comment your Changes
Before creating a pull request, make a comment on the issue containing your changes. We're doing this since the GitHub organization feature is paid and we are doing this for free, so there is only one person who is able to merge pull requests at the moment.
Create a Pull Request
Now you'll be able to go to the original repository link and go to the "Pull Requests" tab and create a new pull request.
Select your branch unit1-worksheet, and create a description and mention an issue by number (e.g., #5).
Supporting Material
Below are links to the necessary materials to build out the course templates:
- Look over the template pages wiki, or directly here:
Ancillary unit videos provided by Scott:
PDF and docs directly related to each Unit of the course:
It is strongly encouraged that contributors test their changes before making commits. To help facilitate this process a set of instructions and guidelines are provided below. These guidelines are by no means a requirement or the only set of procedures to locally develop on this project.
The examples, code, and commands provided below were developed using such technologies as Ansible, containers, bash scripts, and more.
Build Dependencies
The ProLUG Security Course (psc) utilizes mdBook (markdown Book), a friendly and popular markdown utility that quickly exports files and web structures for documentation or general website use cases.
Utilizing mdBook this course then deploys the exported web structure to a Git Pages workflow and runner that then produces an easily navigable website.
Below is the current workflow that deploys the Git Page for the course:
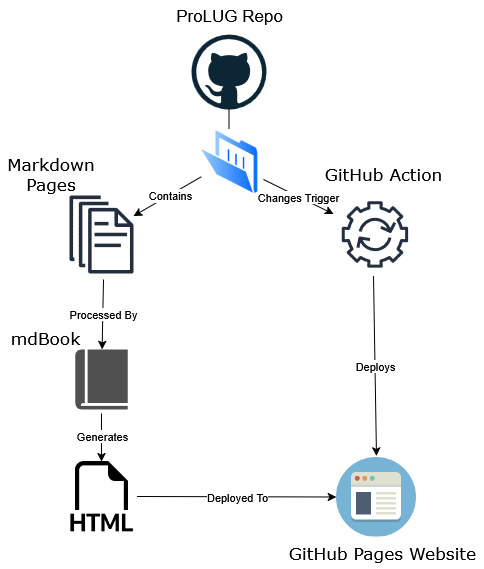
To achieve this deployment locally the following environment and dependencies are required:
- 1. A localhost, this could be a container, virtual machine, or local machine
- 2. The following packages installed on such machine:
- - httpd or apache
- - git
- - gcc
- - rust
- - cargo
- 3. And a clone of a ProLUG repository
Building, Deploying, and Developing Locally
Below is a set of scripts and Ansible-Playbooks that can quickly achieve this environment in an automated fashion. They are only designed to "standup" these machines, they are otherwise unintelligent and will not manage or cleanup environments if things go awry.
Ansible-Playbook
https://github.com/ProfessionalLinuxUsersGroup/psc/blob/main/src/assets/deploy/ansible-playbook.yml
To use this playbook, your machine(s)/containers must be configured correctly for Ansible. If you don't know the requirements to administer a machine via Ansible documentation has been provided below.
Getting started with Ansible:
https://docs.ansible.com/ansible/latest/getting_started/index.html
Bash Script
Many of these commands assume a root user.
Export and execute this script to your machine/container.
Dependencies can total over ~500MB compressed and 1-2GB unpackaged or more.
Debian containers/machines will require building many of these packages from source or adding additional repositories as Debian has a far slower package version adoption rate for stability, thus is not recommended for deploying mdBook.
These scripts will take up to 5-7 minutes to download the necessary dependencies and compile mdBook depending on the machine/container's capabilities.
Tested with Rocky 9 and Ubuntu 24.04 Containers.
APT frontends:
#!/usr/bin/env bash
apt-get update
apt-get -y install apache2 git gcc rustc-1.80 cargo-1.80
cargo-1.80 install --locked mdbook@0.4.48
systemctl enable --now apache2
cd && git clone https://github.com/ProfessionalLinuxUsersGroup/psc
echo 'PATH=$PATH:~/.cargo/bin/' | tee -a ~/.profile
export PATH=$PATH:~/.cargo/bin/ && echo $PATH | grep cargo
cd ~/psc && mdbook build -d /var/www/html
systemctl restart apache2
DNF frontends:
#!/usr/bin/env bash
dnf update
dnf install -y httpd git gcc rust cargo
cargo install --locked mdbook
systemctl enable --now httpd
cd && git clone https://github.com/ProfessionalLinuxUsersGroup/psc
echo 'PATH=$PATH:~/.cargo/bin/' | tee -a ~/.bash_profile
export PATH=$PATH:~/.cargo/bin/ && echo $PATH | grep cargo
cd ~/psc && mdbook build -d /var/www/html
systemctl restart httpd
From here you can use such commands from your localhost to implement changes:
cd {working psc directory} #for example: /root/psc or ~/psc
mdbook build -d /var/www/html
systemctl restart {httpd or apache}
These commands will switch your shell into the appropriate directory, execute the necessary cargo binaries located in its installed PATH, build the mdBook from any files that were changed, and then finally restart the web server.
From there you should be able to see any changes you have made are reflected.
Or send commands over to a networked container or machine:
Note: To minimize complexity and given the nature of commands over SSH, these commands will need to utilize absolute paths.
scp {working directory}/{targeted document} {TARGET_IP}:/root/psc/src/{targeted document}
ssh {TARGET_IP} "cd /root/psc && ~/.cargo/bin/mdbook build -d /var/www/html && systemctl restart httpd"
An example of the workflow after making changes:
scp src/development.md 172.16.15.8:/root/psc/src/
ssh 172.16.15.8 "cd /root/psc && ~/.cargo/bin/mdbook build -d /var/www/html && systemctl restart httpd"

Unit 1 - Build Standards and Compliance
- https://csrc.nist.gov/projects/risk-management/about-rmf
- https://www.open-scap.org
- https://excalidraw.com
Unit 2 - Securing the Network Connection
- https://www.activeresponse.org/wp-content/uploads/2013/07/diamond.pdf
- https://ciq.com/blog/demystifying-and-troubleshooting-name-resolution-in-rocky-linux/
- https://docs.rockylinux.org/gemstones/core/view_kernel_conf/
Unit 3 - User Access and System Integration
- https://man7.org/linux/man-pages/man8/pam_access.8.html
- https://docs.rockylinux.org/books/admin_guide/06-users/
- https://docs.rockylinux.org/guides/security/authentication/active_directory_authentication/
- https://docs.rockylinux.org/guides/security/pam/
Unit 4 - Bastion Hosts and Airgaps
- https://github.com/het-tanis/prolug-labs/tree/main/Linux-Labs/210-building-a-bastion-host
- https://killercoda.com/het-tanis/course/Linux-Labs/210-building-a-bastion-host
- https://killercoda.com/het-tanis/course/Linux-Labs/204-building-a-chroot-jail
- https://public.cyber.mil/stigs/downloads/
- https://github.com/het-tanis/stream_setup/blob/master/roles/bastion_deploy/tasks/main.yml
- https://aws.amazon.com/blogs/security/tag/bastion-host/
- https://aws.amazon.com/search/?searchQuery=air+gapped#facet_type=blogs&page=1
- https://www.sans.org/blog/the-ultimate-list-of-sans-cheat-sheets/
- https://www.sans.org/information-security-policy/
Unit 5 - Updating Systems and Patch Cycles
- https://www.redhat.com/en/blog/whats-epel-and-how-do-i-use-it/
- https://wiki.rockylinux.org/rocky/repo/
- https://sig-core.rocky.page/documentation/patching/patching/
- https://docs.rockylinux.org/books/admin_guide/13-softwares/
- https://httpd.apache.org/
- https://killercoda.com/het-tanis/course/Ansible-Labs/102-Enterprise-Ansible-Patching
- Linux InfiniBand Drivers
Unit 6 - Monitoring and Parsing Logs
- https://www.fluentd.org/architecture
- https://landscape.cncf.io/guide#observability-and-analysis--observability
- https://docs.aws.amazon.com/wellarchitected/latest/framework/sec_detect_investigate_events_app_service_logging.html
- https://get.influxdata.com/rs/972-GDU-533/images/Customer%20Case%20Study_%20Wayfair.pdf
- https://catalog.workshops.aws/well-architected-security/en-US/3-detection/40-vpc-flow-logs-analysis-dashboard/1-enable-vpc-flow-logs
- https://killercoda.com/het-tanis/course/Linux-Labs/108-kafka-to-loki-logging
- https://kafka.apache.org/uses
- https://grafana.com/docs/loki/latest/reference/loki-http-api/#query-logs-within-a-range-of-time
- https://killercoda.com/het-tanis/course/Linux-Labs/102-monitoring-linux-logs
- https://grafana.com/docs/loki/latest/get-started/architecture/
- https://killercoda.com/het-tanis/course/Linux-Labs/206-setting-up-rsyslog
- https://aws.amazon.com/blogs/security/logging-strategies-for-security-incident-response/
- https://sre.google/sre-book/monitoring-distributed-systems/
- https://jvns.ca/blog/2019/06/23/a-few-debugging-resources/
- https://google.github.io/building-secure-and-reliable-systems/raw/ch15.html#collect_appropriate_and_useful_logs
- https://grafana.com/docs/loki/latest/query/analyzer/
Unit 7 - Monitoring and Alerting
- https://grafana.com/docs/grafana/latest/panels-visualizations/configure-thresholds/
- https://prometheus.io/docs/alerting/latest/configuration/
- https://killercoda.com/het-tanis/course/Linux-Labs/110-fail2ban-with-metric-alerting
- https://killercoda.com/het-tanis/course/Linux-Labs/109-fail2ban-with-log-monitoring
- Log data analysis - Use cases · Wazuh documentation
- Security Information and Event Management (SIEM). Real Time Monitoring | Wazuh
- https://docs.google.com/document/d/199PqyG3UsyXlwieHaqbGiWVa8eMWi8zzAn0YfcApr8Q/edit?tab=t.0
- https://microsoft.github.io/code-with-engineering-playbook/observability/log-vs-metric-vs-trace/
- https://promlabs.com/promql-cheat-sheet/
Unit 8 - Configuration Drift and Remediation
- https://en.wikipedia.org/wiki/Configuration_management
- https://google.github.io/building-secure-and-reliable-systems/raw/ch14.html#treat_configuration_as_code
- https://killercoda.com/het-tanis/course/Ansible-Labs/12-Ansible-System-Facts-Grouping
- https://killercoda.com/het-tanis/course/Ansible-Labs/19-Ansible-csv-report
- https://killercoda.com/het-tanis/course/Ansible-Labs/16-Ansible-Web-Server-Env-Deploy
- https://killercoda.com/playgrounds/scenario/ubuntu
Unit 9 - Certificate and Key Madness
- https://nvlpubs.nist.gov/nistpubs/SpecialPublications/NIST.SP.800-57pt1r5.pdf and
- https://nvlpubs.nist.gov/nistpubs/SpecialPublications/NIST.SP.800-52r2.pdf/
- https://nvlpubs.nist.gov/nistpubs/SpecialPublications/NIST.SP.800-57pt1r5.pdf/
- https://nvlpubs.nist.gov/nistpubs/SpecialPublications/NIST.SP.800-207.pdf
- https://killercoda.com/killer-shell-cks/scenario/certificate-signing-requests-sign-k8s
- https://killercoda.com/killer-shell-cks/scenario/certificate-signing-requests-sign-manually
- https://killercoda.com/het-tanis/course/Linux-Labs/212-public-private-keys-with-ssh
- https://spiffe.io/pdf/Solving-the-bottom-turtle-SPIFFE-SPIRE-Book.pdf
- https://killercoda.com/het-tanis/course/Linux-Labs/211-setting-up-rsyslog-with-tls
Unit 10 - Recap and Final Project
Misc
- overleaf.com
- https://www.overleaf.com/
- https://gdpr.eu/what-is-gdpr/
- https://www.hhs.gov/hipaa/for-professionals/security/laws-regulations/index.html
- https://www.youtube.com/watch?v=eHB8WKWz2eQ&list=PLyuZ_vuAWmprPIqsG11yoUG49Z5dE5TDu
- worksheet
- lab
- bonus
- intro
- template pages wiki
- https://git-scm.com/book/en/v2/Git-Tools-Stashing-and-Cleaning
- https://www.atlassian.com/git/tutorials/saving-changes/git-stash
- great write-up on this procedure
- https://git-scm.com/book/en/v2/Git-Branching-Rebasing
- original repository link
- GitHub CLI
- freeCodeCamp's Git and GitHub Crash Course (1hr)
- Fireship's How to use Git and Github (12m)
- ByteByteGo's Git Explained in 4 Minutes (4m)
- https://git-scm.com/doc
- Git
- https://docs.ansible.com/ansible/latest/getting_started/index.html
- https://github.com/ProfessionalLinuxUsersGroup/psc/blob/main/src/assets/deploy/ansible-playbook.yml
- Git Pages workflow
- mdBook
- GitHub
- Scott Champine
- https://www.cisecurity.org/cis-benchmarks
- https://owasp.org/www-project-top-ten/
- https://www.nist.gov/
- https://public.cyber.mil/stigs/srg-stig-tools/
- https://killercoda.com/
- https://github.com/ProfessionalLinuxUsersGroup/psc/